Why Board and Batten Vinyl Siding Installation Transforms Your Home
Board and batten vinyl siding installation is a proven way to give your home a bold, vertical aesthetic with minimal long-term upkeep. Here’s what you need to know before you start:
Quick Installation Overview:
- Prepare the surface – Install horizontal furring strips every 12″ or ensure solid sheathing for proper fastener penetration
- Establish a level baseline – Use a chalk line and level to create a horizontal starting point
- Install trim and J-channels – Add corner posts and J-channel around all openings with proper drainage holes
- Install panels vertically – Start at corners, interlock panels, and nail at the top of slots
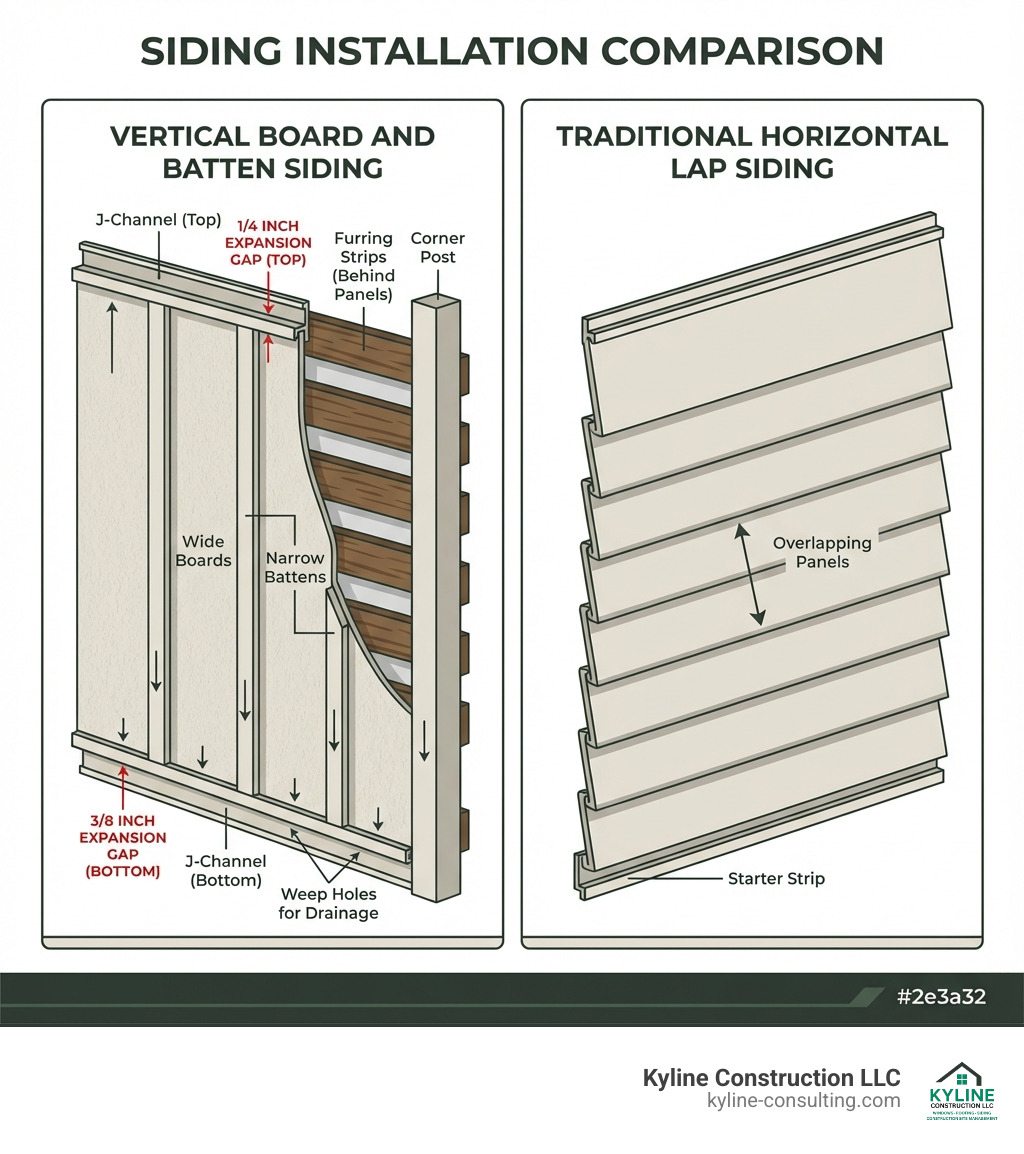
- Allow for expansion – Leave 1/4″ gap at top and 3/8″ at bottom for temperature movement
Board and batten siding creates an exterior look with bold vertical shadow lines that dramatically reproduces early-American architectural style. This design alternates wide boards with narrow battens, creating a layered and textured appearance that improves rustic charm while offering modern practicality.
Why Choose Vinyl Over Other Materials?
Vinyl board and batten offers several advantages compared to wood or steel alternatives:
- Durability: Can last up to 20 years with minimal maintenance
- Low maintenance: No painting, staining, or sealing required
- Cost-effective: More affordable than wood and easier to install than steel
- Weather-resistant: Won’t warp, rot, or deteriorate like wood in harsh conditions
However, vinyl can become brittle in extreme cold and may fade over time compared to steel’s 40-year warranty. Wood offers authentic appearance but requires regular maintenance and is prone to warping.
Preparation: Gathering Supplies and Prepping Your Walls
Before we dive into the fun part of seeing your home transform, proper preparation is key. Think of it as laying the groundwork for a masterpiece. We’re talking about gathering everything you need and getting your walls ready to receive their beautiful new finish.
Essential Tools and Materials for Board and Batten Vinyl Siding Installation
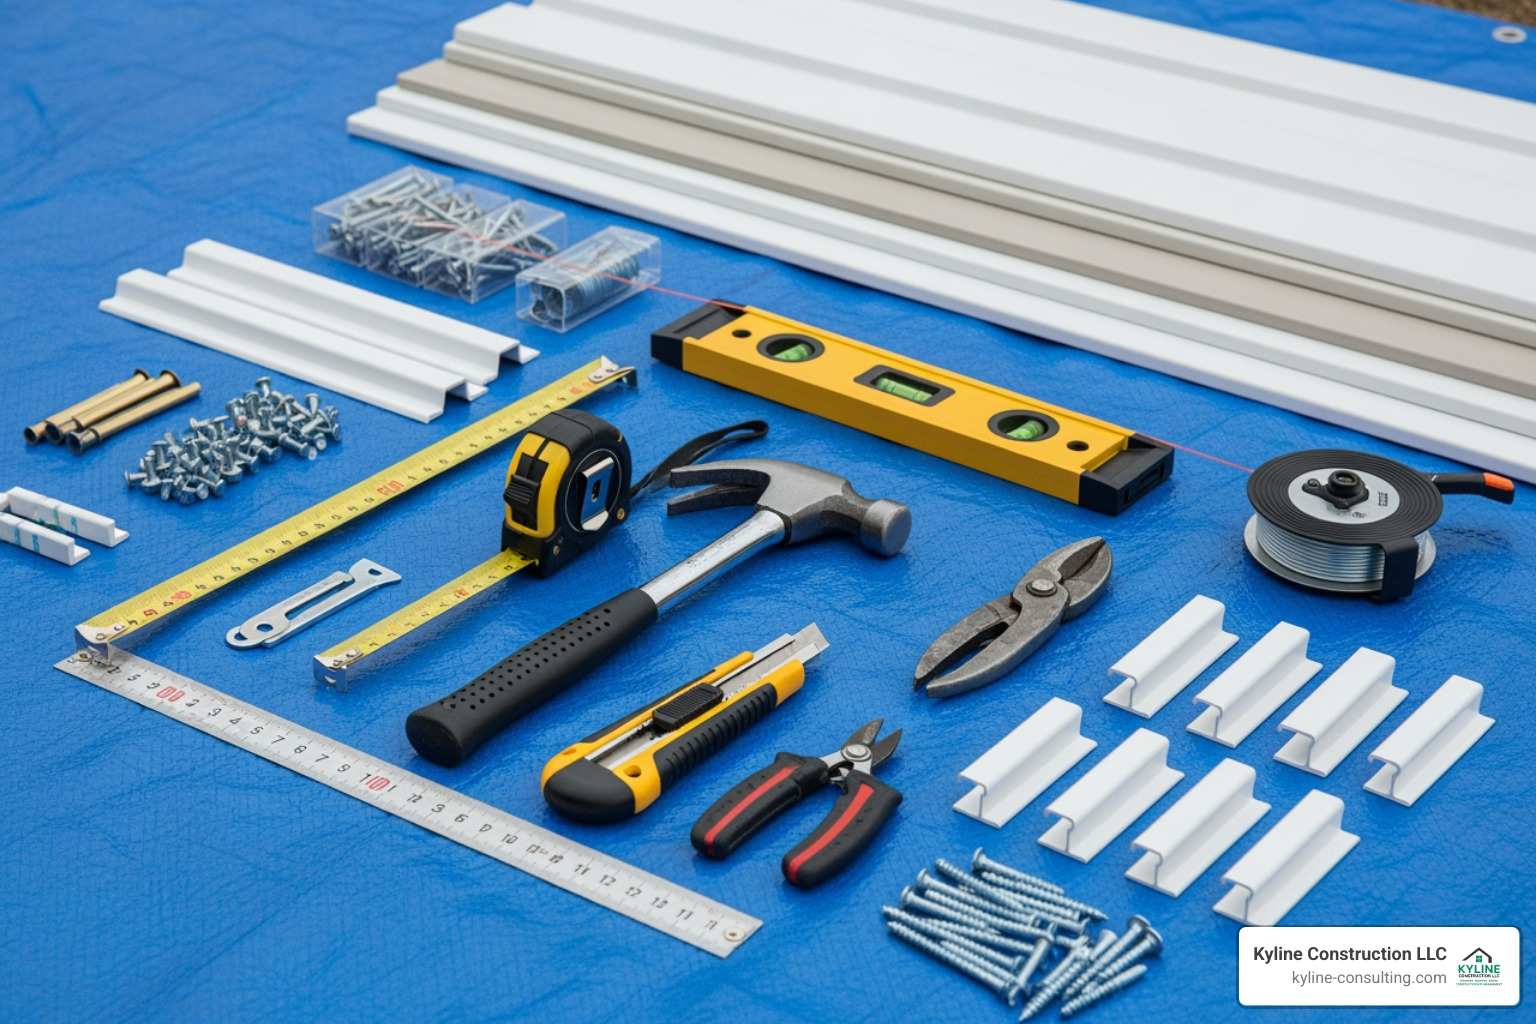
A successful board and batten vinyl siding installation starts with having the right tools and materials at your fingertips. Here’s a comprehensive list of what we recommend:
Tools:
- Tape Measure: For precise measurements, naturally.
- 4-Foot Level: Crucial for ensuring everything is perfectly plumb and level.
- Hammer: For manual nailing, if you prefer, or for tapping things into place.
- Tin Snips (or Aviation Snips): Essential for cutting and trimming vinyl, especially around openings.
- Utility Knife: Great for scoring and snapping vinyl panels for clean, straight cuts.
- Circular Saw with a Reversed Fine-Tooth Plywood Blade: For quick and clean cross-cuts on vinyl panels.
- Chalk Line: Indispensable for marking straight lines, particularly for your baseline and panel placement.
- Snap Lock Punch (or Vinyl Siding Punch): This special tool creates locking tabs on cut edges of panels, allowing them to interlock securely into receiving channels like undersill trim.
- Nail Slot Punch: Used to elongate nail holes on cut edges, allowing for proper expansion and contraction.
- Power Screwdriver or Pneumatic Nailer: For faster and more efficient fastening, ensuring consistent depth (though manual nailing offers more control for beginners).
Materials:
- Vinyl Panels (Board and Batten Style): The star of the show! Ensure you order 10% to 20% more material than calculated to account for waste from angled cuts, especially for gables.
- Inside and Outside Corner Posts: These are essential trim pieces that provide a finished look at the corners of your home and act as receivers for your vertical panels.
- J-Channel: Used around windows, doors, and at the top and bottom of wall sections to receive the edges of the vinyl panels.
- Undersill Trim (or Utility Trim): A crucial piece for securing the top-most or final cut panels, especially when a J-channel isn’t sufficient.
- Corrosion-Resistant Fasteners: We recommend aluminum, stainless steel, or galvanized roofing nails (1.5 inches minimum, with a 5/16-inch head) or screws. These should penetrate at least 1-1/4 inches into nailable material.
- Weather-Resistant Barrier (WRB): Such as Tyvek or Tri-Built house wrap, this goes behind the siding to protect your home from moisture and air infiltration.
- Furring Strips: If your wall surface isn’t perfectly flat or you’re installing over existing siding, these wood strips (typically 1x2s or 1x3s) create a level, nailable surface.
- Flashing: For proper water management around windows and doors, used in conjunction with the WRB.
Wall Surface and Weatherproofing Prep
Now that we have our arsenal of tools and materials, let’s get the walls ready. This step is critical for the longevity and performance of your new board and batten vinyl siding installation.
Removing Old Siding and Repairs: First things first, if you have existing siding, we strongly recommend removing it. While some vinyl can go over old siding, it often leads to an uneven surface, which can cause the new siding to warp or buckle. Removing old siding might take half a day or more, depending on your home’s size, but it’s worth it for a smooth, stable foundation. We’ll also inspect the exposed sheathing (OSB or plywood, ideally at least 7/16″ thick) for any damage. Any rotten wood, loose panels, or irregularities should be repaired or replaced to ensure a sound, level surface. Vinyl siding must always be applied over a rigid sheathing; never directly over open studs or furring strips without a solid backing.
Installing a Weather-Resistant Barrier (WRB): Once the sheathing is sound, we’ll install a weather-resistant barrier (WRB). This is your home’s first line of defense against moisture. The WRB should be installed according to manufacturer specifications, typically overlapping layers from bottom to top to shed water effectively.
Proper Flashing Around Windows and Doors: This is where many DIY projects go wrong, but we know its importance. We’ll carefully flash around all windows and doors. This involves using self-adhering flashing tapes and/or metal flashing to create a watertight seal, directing any water that gets behind the siding away from your home’s vulnerable openings. Vinyl siding is not watertight, so proper flashing is paramount.
Installing Horizontal Furring Strips: For a truly professional board and batten vinyl siding installation, especially if your walls aren’t perfectly flat or if you’re installing over certain types of existing siding, horizontal furring strips are a game-changer. We install these every 12 inches on-center to create a perfectly level and plumb surface. This not only ensures a uniform appearance but also provides a solid nailing base, crucial for the 3/4-inch fastener penetration required. These strips also create a rain screen gap, allowing any moisture that penetrates the siding to drain away and the wall to breathe.
At Kyline Construction LLC, our Services always prioritize this meticulous preparation, knowing it’s the foundation of a durable and beautiful exterior for homes across Circleville, Columbus, and throughout Ohio.
The Step-by-Step Board and Batten Vinyl Siding Installation Process
With your walls prepped and materials ready, it’s time to bring your vision to life. This is where the board and batten vinyl siding installation truly takes shape, piece by careful piece.
Installing Trim, Channels, and Establishing a Baseline
The trim and channels are the framework that guides your siding and ensures a clean, finished look.
Installing Corner Posts: We start by installing the inside and outside corner posts. These serve as the aesthetic borders for your siding and are crucial receiving channels. Ensure they are perfectly plumb using your level. Vinyl expands and contracts, so we leave a 1/4-inch gap at the top where the corner post meets the soffit or eaves. At the bottom, we extend the corner post 1/4-inch below where your starter course (bottom J-channel) will be, allowing for downward expansion. Fasten them loosely enough to allow for movement, but securely.
Establishing a Level Baseline: For vertical siding, our starting point isn’t a traditional starter strip. Instead, we establish a precise horizontal baseline 1 inch above the lowest point of your substrate using a chalk line and level. This line will guide the installation of your bottom J-channel, ensuring all subsequent panels are perfectly level.
Installing Bottom J-Channel as a Receiver: Along your established baseline, we install the bottom J-channel. This acts as the “starter course” for your vertical panels. Crucially, we drill 3/16-inch weep holes every 12 to 24 inches along the bottom edge of this J-channel. These little holes are vital for allowing any moisture that collects behind the siding to escape, preventing water damage.
Installing J-Channel Around Windows, Doors, and Eaves: Next, we install J-channel around all openings and along the eaves.
- Around Windows and Doors: For a watertight seal, the J-channel at the top of the opening should extend over the side J-channel by 1/4 inch. We then cut and bend this overlap down to create a “kick-out” that directs water away from the side channels and the opening. When overlapping J-channel pieces, we allow for 3/4-inch overlap to accommodate horizontal expansion. Always leave a 1/4-inch gap between the J-channel ends and corner posts.
- Along Eaves: J-channel is installed along the underside of eaves to provide a clean termination point and receiving channel for the top of your vertical panels.
Key Techniques for Your Board and Batten Vinyl Siding Installation
Now for the main event: installing the panels themselves. This is where precision and patience pay off.
Starting the First Panel at a Corner: We typically begin our vertical board and batten vinyl siding installation at an outside corner. To prepare the corner, we fill the channel of the corner post by nailing down a 2-inch wide strip of board (often a piece of the furring strip). Then, a strip of finish trim is pushed into the channel over this board and nailed. For the very first vinyl panel, we cut off its locking leg. Then, using a snap lock punch, we create locking tabs along its cut edge at 12-inch intervals. This punched edge is then pushed into the finish trim, allowing the panel to interlock securely.
Interlocking Subsequent Panels and Checking for Plumb: After the first panel is securely in place, subsequent panels simply interlock with the previous one. As we move across the wall, we continuously check for plumb with our level every few panels. This ensures your bold vertical lines remain perfectly straight, giving your home that crisp, clean aesthetic.
Fastening Techniques: Proper fastening is paramount for allowing vinyl to expand and contract freely.
- First Nail: For each panel, the very first nail (or screw) is positioned at the upper edge of the uppermost nailing slot. This allows the panel to “hang” properly.
- Subsequent Nails: All remaining fasteners are placed in the center of the nailing slots.
- Loose Nailing: Crucially, we never drive fasteners tight. We always leave a 1/16-inch to 1/8-inch gap between the fastener head and the nail hem. This space is essential for the vinyl to move with temperature changes without buckling or warping.
- Fastener Penetration and Spacing: Ensure fasteners penetrate at least 1-1/4 inches into nailable material. For standard installations, nails are spaced every 12 to 16 inches. In high-wind areas, we’ll tighten this to every 8 inches and use the top two nail slots for added security.
Cutting Panels for Obstacles: When encountering windows, doors, or other obstacles, we measure carefully. Panels are cut to length, subtracting for the necessary expansion gaps (1/4-inch at the top, 3/8-inch at the bottom). For rip cuts (cutting lengthwise), we use a utility knife to score and snap. For cross-cuts, our circular saw with a reversed blade provides clean edges. When a panel’s nail hem is cut off to fit, we use a nail slot punch to create new elongated nail holes, ensuring proper movement.
Finishing Touches and Trim Work
The final steps are all about completing the look and ensuring long-term performance.
Installing the Last Panel: When we reach the end of a wall or a corner, the last panel often needs to be trimmed to fit. We measure the remaining space and cut the panel to width, creating new locking tabs with our snap lock punch if needed. This trimmed panel is then fitted into the receiving channel of the corner post or J-channel. If it’s a cut edge, undersill trim is often employed to secure it neatly.
Finishing the Top of the Wall: The top of the wall is finished with J-channel, which receives the top edge of your vertical panels. Again, we ensure proper expansion gaps are left between the panel ends and the J-channel.
Installing Siding on Gable Ends: Gable ends add architectural interest and require careful attention. We cut panels to match the roof angle, ensuring a balanced appearance. The top edge of these angled panels will fit into J-channel installed along the rake (the sloping edge of the gable). It’s important to flash underneath these gable end J-channels to prevent water infiltration at the roofline.
Pro Tips for a Durable, Long-Lasting Finish
We’ve covered the basics, but a truly long-lasting board and batten vinyl siding installation in Ohio requires understanding the nuances, especially how vinyl behaves in our diverse climate.
Managing Expansion and Contraction
Vinyl siding is a dynamic material; it moves. This is the single most important concept to grasp for a successful installation.
Why Vinyl Moves: Vinyl is made from organic materials, and like many plastics, it expands when heated and contracts when cooled. Our Ohio temperatures can swing quite a bit, so this movement is constant. If the siding is nailed too tightly, it can’t move freely, leading to unsightly buckling, warping, or even cracking. This is why we stress “loose nailing” and leaving appropriate gaps.
Specific Gaps for Vertical Siding: For vertical panels, most of the expansion and contraction occurs downwards. Therefore, we use specific offsets:
- Top Offset: We leave a 1/4-inch gap between the top of the panel and the receiving J-channel or trim.
- Bottom Offset: We allow a larger 3/8-inch gap at the bottom of the panel, within the receiving J-channel. This greater allowance at the bottom accounts for the majority of the panel’s downward movement.
Cold Weather Adjustments: When installing in colder temperatures (below 40°F), vinyl is already contracted. To ensure sufficient room for expansion when warmer weather arrives, we add an additional 1/8-inch to all cut-back measurements. So, a 1/4-inch gap becomes 3/8-inch, and a 3/8-inch gap becomes 1/2-inch. This foresight prevents problems down the road.
Special Considerations for Climate and High-Wind Areas
Ohio’s weather can be unpredictable, from humid summers to freezing winters and occasional high winds. Our board and batten vinyl siding installation techniques are adapted to these conditions.
High-Wind Nailing Patterns: In high-wind regions, which parts of Ohio can certainly experience, standard nailing might not be enough. We increase fastener frequency to every 8 inches and ensure fasteners are placed in the top two nail slots of the panel. This provides extra security against panels dislodging in strong gusts.
Importance of Weep Holes: Weep holes are not optional, especially in a climate like Ohio’s where rain and snow are common. The 3/16-inch holes we drill every 12 to 24 inches in the bottom J-channel are crucial for allowing any trapped moisture to escape. Without them, water can accumulate, leading to mildew, rot in the sheathing, and potential structural damage.
Vinyl Brittleness in Extreme Cold: Vinyl becomes more brittle when temperatures drop below freezing. During winter installations in Columbus, Circleville, or other parts of Ohio, we handle panels with extra care to prevent accidental cracking. We also advise homeowners to avoid cleaning siding with power washers when temperatures are near or below freezing.
Local Building Codes: We always emphasize the importance of checking local building codes. While our practices align with industry best standards, specific requirements can vary even within Ohio. Compliance ensures safety and avoids future headaches.
Should your siding ever suffer damage from severe weather, our Emergency Repair Services are here to help restore your home’s protection and curb appeal.
Frequently Asked Questions about Vinyl Board and Batten Installation
We often get questions about board and batten vinyl siding installation, especially from homeowners used to traditional horizontal siding. Let’s address some common queries.
More info about our Articles & FAQs.
How is vertical siding installation different from horizontal?
The fundamental difference lies in direction and how expansion is managed.
- Starting Method: Horizontal siding typically starts with a “starter strip” at the bottom of the wall. Vertical siding, however, requires a J-channel installed along a level baseline at the bottom to act as a receiver for the vertical panels.
- Expansion Direction: While both types of vinyl siding expand and contract, horizontal siding primarily moves horizontally. Vertical siding, due to gravity, mostly expands and contracts downwards. This dictates the specific expansion gaps (1/4″ top, 3/8″ bottom) and the placement of the first nail at the top of the slot.
- Trim Pieces: Corner posts and J-channels function similarly but are oriented to receive vertical panels. The way J-channels overlap and are configured around openings also has unique considerations for vertical applications.
Can I install vinyl siding directly over old wood siding?
While technically possible in some scenarios, we strongly advise against installing new vinyl siding directly over old wood siding without proper preparation.
- Uneven Surface: Old wood siding, especially clapboard, often has an uneven surface due to warping, cupping, or previous repairs. Installing new vinyl directly over this will transfer those imperfections, leading to a wavy, unattractive finish that can also compromise the siding’s performance and longevity.
- Moisture Trapping: Layering siding can create new moisture traps if not done correctly, potentially accelerating rot in the old wood siding and sheathing.
- Best Practice: For the best results and a truly durable, long-lasting board and batten vinyl siding installation, we recommend one of two approaches:
- Remove Old Siding: This is our preferred method, allowing us to inspect and repair the sheathing, install a proper WRB, and create a perfectly flat surface.
- Install Furring Strips: If removing old siding isn’t feasible, we install horizontal furring strips (8-12 inches on center) directly over the old siding. This creates a new, level plane and a nailable surface for the vinyl, effectively negating the unevenness of the original siding.
How do I clean and maintain my new board and batten siding?
One of the great joys of vinyl siding is its low maintenance!
- Routine Cleaning: For general dirt and grime, a simple cleaning with a garden hose is often sufficient. For more stubborn spots, we recommend using a soft-bristle brush or cloth with a solution of mild soap and water (e.g., three parts water to one part vinegar or bleach). Always clean from the bottom up to prevent streaking, and rinse thoroughly from the top down.
- Avoid Harsh Chemicals: Steer clear of abrasive cleaners, harsh solvents, or stiff brushes, as these can damage the vinyl’s surface.
- Power Washing: If using a power washer, use a low-pressure setting and keep the nozzle moving to avoid forcing water behind the panels or damaging the vinyl. Always follow the siding manufacturer’s recommendations.
- Annual Inspection: We recommend an annual inspection. Look for any loose panels, damaged trim, or areas where caulking might be failing. Addressing small issues promptly prevents them from becoming larger problems.
- Winter Care: Avoid cleaning your vinyl siding when temperatures are near or below freezing, as the vinyl becomes more brittle and susceptible to damage.
Conclusion: Enjoy Your Beautiful New Siding
You’ve made it! A well-executed board and batten vinyl siding installation is more than just a home improvement project; it’s an investment in your property’s future. You’re not just getting a new exterior; you’re gaining:
- Improved Curb Appeal: The distinctive vertical lines and bold shadow play offer a modern yet timeless aesthetic that truly stands out.
- Impressive Durability: Vinyl’s resistance to rot, pests, and the elements means your home is well-protected.
- Low Maintenance: Say goodbye to painting, scraping, and staining. Enjoy more free time!
There’s immense satisfaction in tackling a DIY project like this, knowing you’ve poured your effort into enhancing your home. However, we also understand that not everyone has the time, tools, or inclination for such a detailed undertaking. For homeowners in Circleville, Columbus, and across Ohio who prefer a guaranteed professional result, Kyline Construction LLC offers over 40 years of experience. Our seasoned professionals ensure quality, safety, and a flawless finish, backed by our commitment to excellence.
We’re here to turn your vision into reality. Contact Us for your professional siding installation and let us provide you with a free, no-obligation estimate today.