Is Your Basement One Fire Away From a Tragedy?
Egress window installation is the process of cutting a code-compliant emergency escape opening into a basement wall, then fitting it with a large window, a window well, drainage, and — when required — a safety ladder.
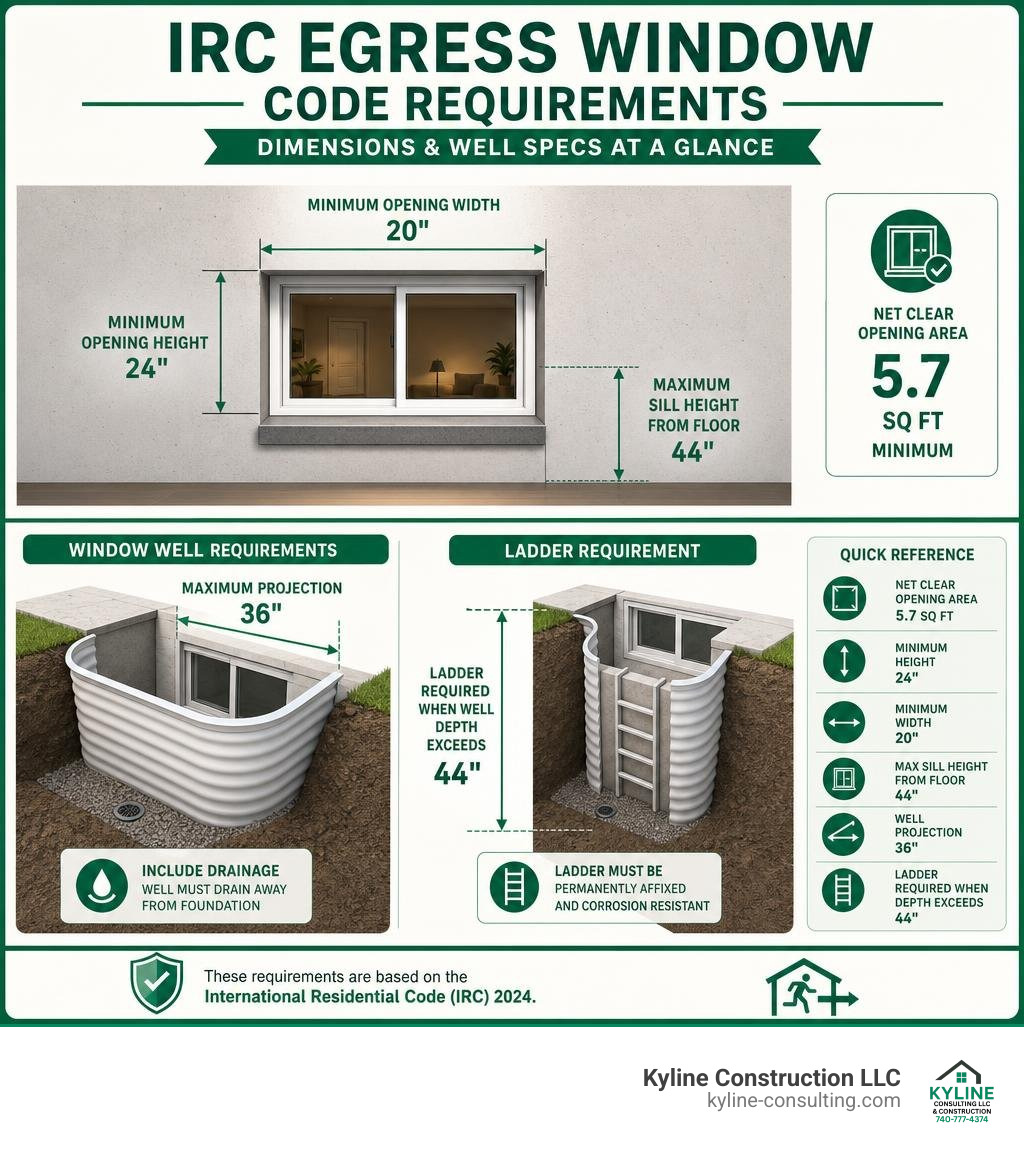
Here is what the IRC 2024 code requires at a glance:
| Requirement | Minimum Standard |
|---|---|
| Net clear opening area | 5.7 sq ft |
| Minimum opening height | 24 inches |
| Minimum opening width | 20 inches |
| Maximum sill height from floor | 44 inches |
| Window well projection | 36 inches |
| Ladder required when well depth exceeds | 44 inches |
Most basement windows built before 1980 have a net clear opening of only 1.5–3 sq ft. That is less than half what the code requires — and in a fire, that gap is the difference between escape and entrapment.
This is not a small window swap. It is a construction project that involves excavation, concrete cutting, structural framing, waterproofing, and permits. Done right, it can add $15,000–$40,000 to your home’s appraised value by converting an illegal basement room into a legal bedroom. Done wrong, it can flood your basement, compromise your foundation, or fail a safety inspection.
Basic egress window installation glossary:
Egress Codes, Basement Requirements, and Home Value
When we talk about basement safety in Central Ohio, we aren’t just talking about keeping the space dry; we are talking about saving lives. The International Residential Code (IRC) 2024 mandates very specific guidelines for emergency escape and rescue openings. If you are planning a basement finishing project in Delaware, OH, or trying to turn that dark lower level into a functioning bedroom, you must comply with these codes.
To legally classify a basement room as a bedroom, the room must meet four distinct criteria:
- It must have a minimum of 70 square feet of floor space.
- It must have ceiling heights of at least 7 feet.
- It must have an adequate heating source.
- It must feature at least two methods of egress—typically the main stairs and an egress window.
For a comprehensive look at window projects in our northern suburbs, check out our guide on Window Installation in Delaware, Ohio.
The code is unyielding on the physical dimensions of the window itself. The net clear opening—which is the actual clear space created when the window is fully opened, not the size of the glass pane—must be at least 5.7 square feet. Additionally, the opening height must be at least 24 inches, the opening width must be at least 20 inches, and the interior sill height cannot exceed 44 inches from the finished basement floor. If your current basement features old, drafty hopper windows, you are likely looking at a net clear opening of only 1.5 to 3 square feet. To understand how we transition these spaces, take a look at Basement Bliss: A Guide to Hopper Window Replacement in Ohio.
Beyond life safety, compliance has a massive financial impact. In Central Ohio, adding a legal basement bedroom can instantly add $15,000 to $40,000 to your home’s appraised value. When you list your home, non-conforming bedrooms must be disclosed, which can stall sales and turn off buyers. Investing in a professional installation ensures your home’s equity is fully realized.
Window Well and Ladder Specifications
The window is only half of the equation; the window well outside must also meet strict code mandates. The well must provide a clear, unobstructed space of at least 9 square feet, with a minimum horizontal projection (the distance from the window to the outer wall of the well) of 36 inches. This ensures that an adult—or a fully equipped firefighter carrying an oxygen tank—can comfortably exit or enter the space.
If the depth of your window well exceeds 44 inches from the ground level to the bottom of the well, the IRC requires a permanently attached safety ladder or steps. The ladder must be at least 12 inches wide, project at least 3 inches from the well wall, and have rungs spaced no more than 18 inches apart.
To protect the well from Central Ohio’s heavy spring rains and autumn leaves, we highly recommend installing a heavy-duty, UV-resistant polycarbonate cover. This cover must be easily openable from the inside without the use of keys, tools, or special physical effort. For a premium, code-compliant setup, many homeowners opt for packages like the Buy Classic White Egress Kit – White Tilt & Turn Window | Free Shipping | EgressUSA , which pairs a durable steel well with a high-performance window system.
Planning Your Project: Kits, Tools, and Drainage
Before anyone picks up a shovel, we have to plan for the unique challenges of Central Ohio soils. The clay-heavy soils in Columbus and surrounding areas hold onto water like a sponge. This means that every below-grade excavation project must be approached primarily as a water-management project.
When planning, you must select your well depth and window size based on how deep your basement sits below grade. For instance, if your basement floor is 4 feet below the ground, you will need a well depth that matches or slightly exceeds that depth to ensure the window sill sits comfortably under the 44-inch limit.
Integrating the new window well with your existing vinyl siding is also a critical step. We never want to cut into vinyl siding without planning for proper flashing and trim to shed water away from the foundation. If you are looking to coordinate this with other window upgrades in the eastern suburbs, read about Window Installation in Newark, Ohio.
Essential Tools for Egress Installation
If you are planning a DIY installation, or just want to understand the equipment our crews bring to the site, here is the list of essential tools:
- Heavy-duty concrete chainsaw or a walk-behind diamond-blade saw.
- Mini-excavator (highly recommended to move the roughly 10 cubic yards of excavated dirt).
- Rotary hammer drill and concrete anchors.
- Level, plumb bob, and framing square.
- Subsurface drainage pipe and geotextile landscape fabric.
- High-quality caulking gun and exterior-grade silicone sealant.
- Tapered wood shims (used in pairs).
- Personal protective equipment (respirator, safety glasses, and hearing protection).
Choosing the Right Egress Window Kit
When selecting a kit, you want to look at both functionality and energy efficiency. Standard sliding windows are common, but they require a much larger rough opening because only half of the window opens at any given time.
This is why we highly recommend European-style tilt and turn windows or dual-action systems. These windows offer dual functionality: you can tilt the top inward for secure, daily ventilation, or swing the entire sash inward like a door for a wide, unobstructed emergency escape.
Using a pre-matched, complete kit simplifies the entire process. Kits like the Easy Egress Kit for Windows | Dual Action Egress System come with Boman-Kemp steel wells, safety grates, and escape ladders that fit together seamlessly. This eliminates guesswork and ensures every component is fully code-compliant out of the box.
The Step-by-Step Egress Window Installation Process
Installing an egress window is a major structural alteration. It requires pulling permits with your local building department (whether that is in Columbus, Circleville, or Delaware) and carefully planning your structural support.
Because you are cutting a large opening in a load-bearing foundation wall, you must install a structural header above the window opening. This header supports the weight of the floor joists and the walls above while the concrete is being cut and after the window is set.
Once the structural support is verified, the excavation begins. We prefer hand excavation or using small, rubber-tracked mini-excavators to protect your lawn and landscaping. To see how we manage these structural exterior projects in Pataskala, check out our local guide on Window Installation in Pataskala, Ohio.
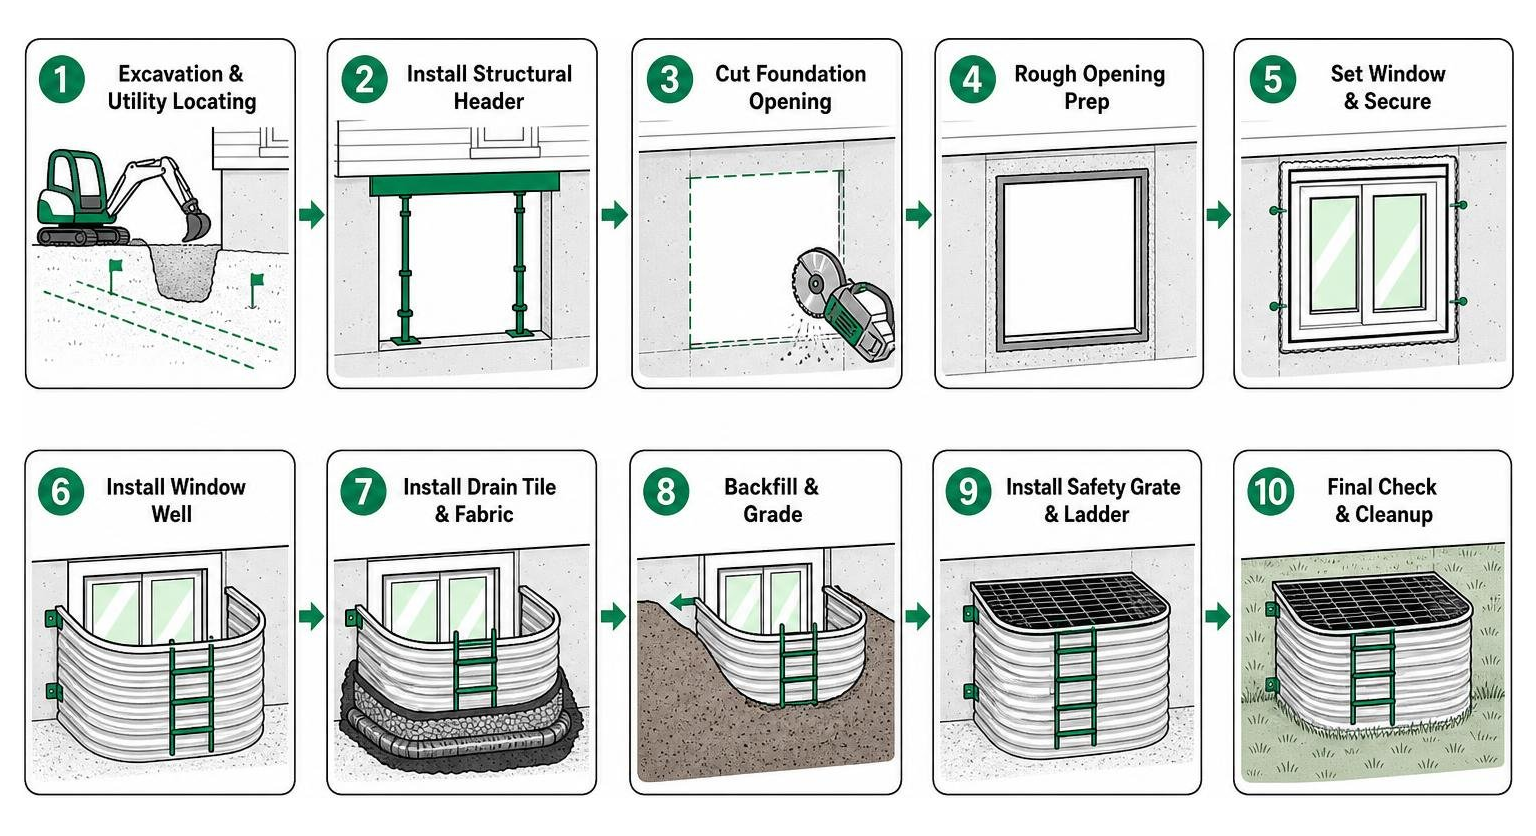
Step-by-Step Guide to Egress Window Installation
Here is the exact process our team uses to ensure a flawless, water-tight installation, based on industry best practices and guides like How to Install an Egress Window – The Great Egress Co :
- Excavation and Utility Locating: Always call 811 to mark underground utilities before digging. Excavate the well area, digging down at least 12 inches below the planned window sill height.
- Install the Drainage System: Run a subsurface drainpipe from the bottom of the well to your home’s footing drains or out to daylight. Fill the bottom of the well with at least 12 inches of 3/4-inch clean angular rock (never fine gravel, which can clog).
- Cut the Foundation Wall: Mark your rough opening on the inside and outside of the wall. Using a concrete chainsaw, cut the opening from the outside in a single pass to keep dust and slurry out of your finished basement.
- Install the Window Bucks: Secure pressure-treated wood framing (bucks) inside the concrete opening using concrete anchors. Apply a thick bead of silicone sealant between the wood and the concrete.
- Test Fit the Window: Place the window unit into the opening to check for clearance. Ensure there is enough physical space for your hand to operate the handle without hitting the ceiling or adjacent walls.
- Shim and Level: Place tapered wood shims in pairs on the sill, spaced no more than 16 inches apart. Set the window, then insert side shims spaced no more than 24 inches apart. Measure diagonally in both directions to ensure the frame is perfectly square.
- Fasten the Window: Pre-drill pilot holes through the vinyl frame and shims to prevent cracking, then drive galvanized screws into the wood bucks.
- Insulate and Seal: Apply a 1-inch to 1.5-inch bead of low-expanding foam around the sides and top of the window frame. Do not overfill, as even low-expanding foam can warp vinyl frames. Fill the remaining gap with loose, fluffy fiberglass insulation.
- Caulk and Trim: Apply a generous bead of high-quality exterior caulk around the frame, and finish the interior with your choice of trim and drywall.
The Real Cost and ROI of Professional Egress Window Installation
Let’s talk numbers. A professional egress window installation typically costs $3,000 to $6,000 for poured concrete or block foundation walls, and $2,000 to $3,500 for wood-frame basement walls. If you are comparing this to standard above-grade window replacements, which usually run $400 to $900 per window depending on size and energy ratings, the initial investment seems higher.
However, the return on investment is unmatched. By legally converting an unfinished basement into a habitable living space, you are adding legitimate square footage to your home. In Columbus and Delaware neighborhoods, this single improvement can increase your home’s appraised value by $15,000 to $40,000. That is a 3x to 4x return on your investment the day the project is completed. To see how this fits into your overall remodeling budget, take a look at The Ultimate Guide to Window Replacement Costs.
Why DIY Egress Window Installation Can Be a Dangerous Trap
It is tempting to look at the cost of a DIY egress kit (which starts around $2,065) and think you can tackle this over a weekend. But as Shawn always warns, this is one of the most dangerous DIY traps in home improvement.
First, there is the risk of structural collapse. Cutting a 4-foot-wide hole in a load-bearing foundation wall without proper temporary shoring can cause your floor joists to sag or, in worst-case scenarios, cause the wall above to crack and collapse.
Second, there is the water issue. If you do not tie the window well drain properly into your foundation’s perimeter drain tile, the well will act as a giant bucket, collecting rainwater and dumping it directly through your new window into your basement. A single bad storm can cause thousands of dollars in water damage, ruin your finished basement, and void your window manufacturer’s warranty. For more on the complexities of this project, you can review the DIY steps in How to Install an Egress Window .
Real Contractors vs. Paper Contractors in Central Ohio
When you decide to hire a professional, you need to know who you are dealing with. The home improvement industry is flooded with “paper contractors.” These are individuals who own a desk, a phone, and a marketing budget, but they do not actually know how to build anything. They subcontract 100% of the work to the cheapest available crews. If a subcontractor walks off the job or makes a mistake, the paper contractor has no idea how to fix it.
A “real contractor”—like the team at Kyline Construction LLC—is run by experienced professionals who have the hands-on skills to step in and finish the job personally if a crew member gets sick or a subcontractor quits. We manage our projects with a level of oversight that paper contractors simply cannot match.
| Feature | DIY Installation | Paper Contractor | Real Contractor (Kyline) |
|---|---|---|---|
| Structural Safety | High Risk of Failure | Variable (Depends on Sub) | Guaranteed (Engineered) |
| Waterproofing | Often Fails | Basic | Subsurface Drainage System |
| Permit Management | Homeowner’s Responsibility | Often Skipped | Handled by Contractor |
| Hands-on Skill | Limited | None (Broker Only) | 40+ Years of Experience |
| Cost | $2,000 – $5,000 | $3,500 – $7,000 | Professional & Competitive |
Frequently Asked Questions About Egress Windows
Do all basement bedrooms require an egress window?
Yes. Under the IRC, every basement room used for sleeping must have at least one code-compliant emergency escape and rescue opening. Even if the basement has a walkout door, individual bedrooms must still have their own compliant window to ensure occupant safety in a fire.
How does an egress window affect my home insurance?
Installing a professional, code-compliant egress window can actually lower your liability risk and improve your coverage options. It proves to your insurance carrier that your basement living space is safe and legally occupied, which is essential if you ever need to file a claim for basement water damage or fire.
Can I install an egress window in a poured concrete foundation myself?
We strongly advise against it. Cutting through 8 to 10 inches of poured, reinforced concrete requires specialized heavy machinery, precise structural calculations, and proper lintel or header installation to prevent structural settling. It is a job best left to licensed professionals.
Conclusion
Adding an egress window is one of the smartest investments you can make in your Central Ohio home. It keeps your family safe, floods your dark basement with natural light, and adds tens of thousands of dollars to your home’s equity.
But don’t dig your own grave by trying to cut corners on structural safety or water management. Trust the local experts who have been serving Columbus, Circleville, and the surrounding areas with honest, high-quality craftsmanship for decades.
Ready to transform your basement safely? Contact Kyline Construction LLC today for a free, no-obligation estimate, and let’s get your project done right. Explore our full range of exterior remodeling options on our Services page.