Before you touch a single pry bar, you need a solid plan. As Shawn, a construction professional working across Central Ohio, I can tell you that a successful casement window installation comes down to prep work and precise measurements. If your rough opening isn’t prepped correctly, even a top-tier window will underperform, bind up, or leak.
When ordering your window, standard practice requires taking the smallest daylight opening measurement and deducting 1/4 inch from both the width and height to determine your net frame size. This leaves a 1/4-inch shim clearance around the entire unit for thermal expansion, leveling, and low-expansion spray foam.
Pocket vs. Full-Frame Replacement Options
One of the first decisions you’ll face is whether to do a pocket replacement or a full-frame replacement.
- Pocket (Insert) Replacement: You leave the existing exterior trim, interior casing, and master frame intact, removing only the old operating sashes and hardware. The new casement unit slides right into the existing pocket. This is faster and less disruptive to surrounding exterior vinyl siding, but it slightly reduces your glass viewing area. Learn more about choosing the right approach in our guide on Cracking the Casement Code: Smart Replacements for Ohio Homes.
- Full-Frame Replacement: You strip the old window down to the bare structural wood studs. This is necessary if the existing frame has water damage or rot. While it takes more labor, full-frame replacement allows you to completely inspect the framing and build a brand-new weatherproofing seal.
| Feature | Pocket (Insert) Replacement | Full-Frame Replacement |
|---|---|---|
| Existing Frame | Kept in place | Completely removed |
| Glass Area | Slightly reduced | Maximized |
| Labor & Cost | Lower ($400–$600 average unit cost) | Higher ($600–$900+ average unit cost) |
| Siding Disruption | Minimal to none | Requires tie-in to vinyl siding/WRB |
| Best For | Sound frames with good original trim | Rotted frames, style changes, or deep upgrades |
Essential Tools, Materials, and Measuring the Opening
To execute a professional-grade installation, gather these materials and tools beforehand:
- Safety glasses and heavy-duty work gloves
- Metal tape measure and a reliable 4-foot level
- Pry bar and a rubber mallet
- Utility knife with fresh blades
- Waterproof composite shims (avoid wood shims, as they absorb moisture and rot over time)
- Low-expansion polyurethane spray foam (specifically formulated for window and door jambs)
- High-performance exterior-grade sealant
- Self-adhering flashing tape and a sill wedge
- #8 x 3-inch finish screws or jamb screws
When measuring a rough opening for a replacement casement window, always follow the rule of three:
- Width: Measure across the top, middle, and bottom of the opening. Record the smallest number.
- Height: Measure from the high point of the sill to the top header on the left, middle, and right. Record the smallest number.
- Depth: Measure the jamb depth from the interior trim face to the exterior stop.
- Squareness: Measure diagonally from corner to corner in both directions. If the two diagonal numbers are within 1/8 inch to 1/4 inch of each other, the frame can easily be shimmed square during set-in.
Step-by-Step Guide to Removing the Old Unit and Weatherproofing
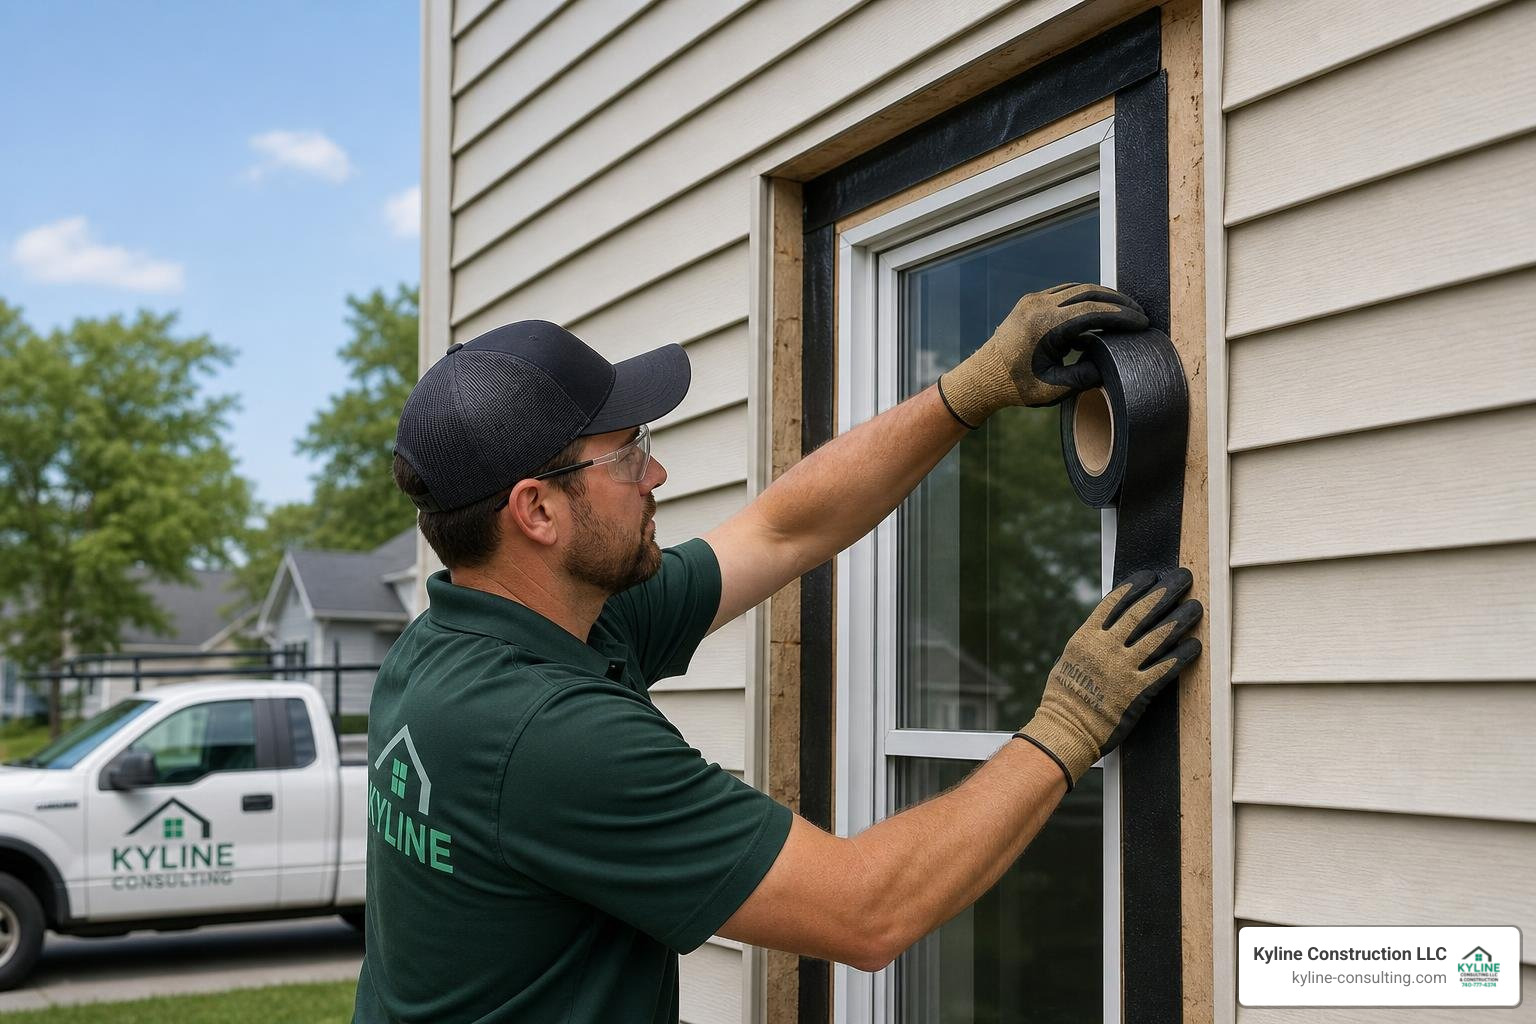
Once your new window is on-site and verified for size, it’s time to prep the opening.
Removing Old Sashes and Cleaning Frame Openings
Start on the inside by using a sharp utility knife to score the paint and caulk lines along the interior trim casing. This prevents the drywall or paint from peeling off when you pop the casing free with a pry bar.
Next, unscrew the operator arm and crank handle from the old casement sash. Carefully remove the sash, parting stops, and old balance mechanisms. If you are doing a full-frame replacement, pry out the old jambs and sill down to the rough framing.
Thoroughly sweep away all old dirt, nails, dried caulk, and debris from the opening. Check every framing stud for soft spots or signs of rot. Any damaged wood must be cut out and replaced before you proceed.
Safety Note: If your home was built prior to 1978, follow EPA lead-safe practices when removing old window components, as lead paint may be present.
Flashing and Waterproofing the Rough Sill
Water management is the single most critical step in window installation. Never skip sill flashing.
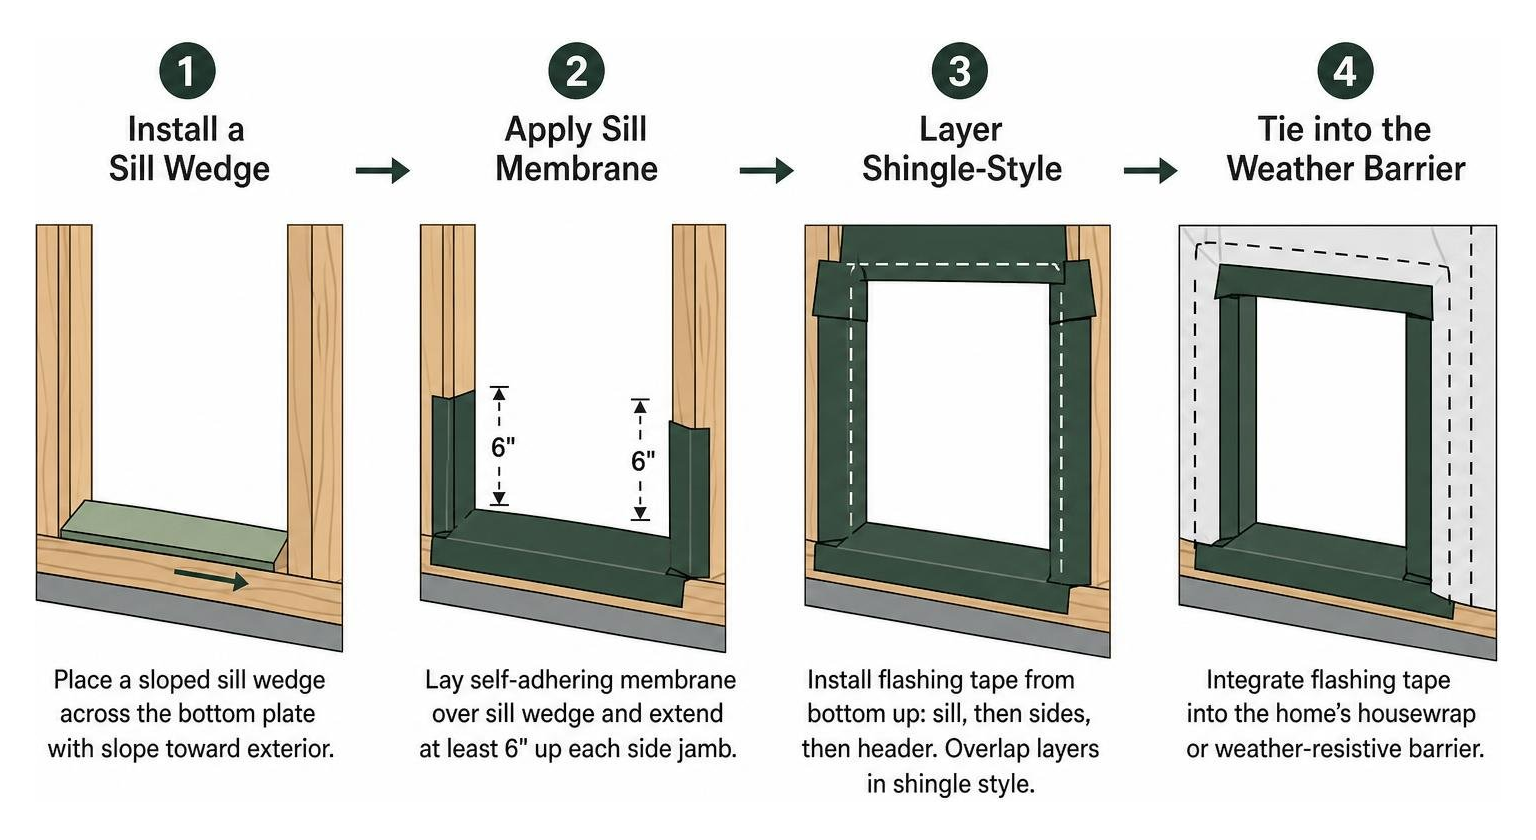
- Install a Sill Wedge: Place a sloped sill wedge across the bottom wood plate to create a positive slope pointing outward. This ensures any water that ever sneaks past the frame drains toward the exterior rather than soaking into your home’s structure.
- Apply Sill Membrane: Lay a layer of self-adhering flashing tape over the sill wedge. Extend the tape horizontally across the entire sill plate and roll it at least 6 inches up each side jamb.
- Layer Shingle-Style: Always install flashing tape from the bottom up. Your bottom sill tape goes down first, followed by side jamb tape, and finally header tape over the top. This overlapping “shingle style” prevents water from finding a lip to slide behind.
- Tie into the Weather-Resistive Barrier: Ensure your flashing tape integrates directly into the home’s housewrap or weather-resistive barrier behind your exterior vinyl siding. For detailed manufacturer specifications on sill pan setup, refer to the official Andersen 400 Series Casement Installation Guide.
Setting, Leveling, and Securing Your New Casement Unit
With your rough opening waterproofed, you’re ready to set the window. Because casement sashes carry weight on one side when opened, precision leveling is mandatory.
Step-by-Step Instructions for Casement Window Installation
- Dry Fit the Unit: Set the replacement window into the opening without glue or fasteners to verify that your 1/4-inch perimeter gap is consistent all around.
- Apply Exterior Sealant: If installing a unit with a nailing flange, apply a continuous 3/16-inch bead of high-grade exterior sealant along the back side of the flange. For replacement units without flanges, set continuous sealant beads along the stop points.
- Set the Window with a Helper: Casement units are heavy and awkward. Have one person guide the window into place from the outside while a second person supports it from the inside.
- Shim for Level, Plumb, and Square: Place waterproof composite shims beneath the bottom frame, roughly 4 inches in from each corner. Use a bubble level to check for plumb (vertical) and level (horizontal). Place opposing shims behind fastener locations along the side jambs. Spacing for side shims should be roughly 24 inches on center.
- Open the Vent Panel: Turn the crank handle to open the casement sash outward. This gives you direct access to the pre-drilled fastener holes hidden along the inside of the frame jambs, a step detailed in technical resources like the Marvin Modern Casement Technical Manual.
- Drive Primary Fasteners: Pre-drill 1/8-inch pilot holes through the shims at the hinge jamb first. Secure the center screw on the hinge jamb using a #8 x 2-1/2 inch or 3-inch finish screw. Re-check your level and plumb. Drive remaining screws through the top and bottom jamb holes, ensuring you do not over-tighten, which can bow the vinyl frame.
- Check Diagonal Squareness: Measure diagonally from top-left to bottom-right, then top-right to bottom-left. The numbers must match within 1/16 inch to 1/8 inch. If they don’t, adjust your composite shims until the unit is perfectly square. For additional tips on thermal performance standards, check out our Energy Efficient Windows Guide 2026.
Insulating, Sealing Exterior Vinyl Siding Joints, and Hardware Testing
Once the unit is mechanically anchored, you must fill the perimeter gap between the window jamb and the wall studs.
Inject low-expansion polyurethane foam into the gap from the interior. Warning: Use only low-expansion foam approved for windows and doors. High-expansion foams will expand with enough force to bow vinyl frame jambs inward, causing the sash to bind and ruining the crank mechanism.
On the exterior, ensure your J-channel or vinyl siding trim aligns snugly against the window frame. Install an aluminum drip cap above the head jamb, tape over its top edge with flashing tape, and apply a continuous bead of exterior-grade sealant along all exterior joints.
Finally, operate the hand crank to open the sash to its full 90-degree outward rotation, then crank it closed and engage the multi-point lock. The sash should pull tight against the frame weatherstripping with smooth, minimal effort.
Common Installation Challenges, AC Units, and DIY vs. Professional Hiring
Even when you follow every instruction to the letter, real-world installation can present a few curveballs.
Troubleshooting Alignment, Reveals, and Installing a Casement Window Air Conditioner
Fixing Uneven Reveals and Sash Drag
If your casement sash drags against the bottom frame or shows an uneven reveal (gap) when closed, the hinge cam studs need adjustment. Open the sash fully, locate the top and bottom hinge tracks, and use a 7/64-inch Allen wrench or 3/8-inch wrench to turn the cam studs slightly left or right. Adjusting these studs shifts the sash position incrementally until the reveal is perfectly uniform.
Installing an Air Conditioner in a Casement Window
Because casement windows open outward on side hinges instead of sliding vertically, installing a window air conditioner requires a distinct setup:
- Select the Right Unit: You cannot use a standard double-hung AC unit. You need a specialized “casement air conditioner,” which is engineered tall and narrow.
- Remove the Sash or Crank: Fully disconnect the operator arm to swing the sash wide, or temporarily remove the sash entirely from its hinges.
- Install a Sill Support Bracket: Heavy AC units cannot rest on the vinyl frame alone. Mount a dedicated exterior support bracket anchored directly into the wall structure below the sill.
- Fill the Upper Gap: Because the tall window space remains open above the AC unit, cut a custom acrylic panel or insulated foam board to fill the open space above the AC unit.
- Seal tight: Use weatherstripping foam and exterior-grade sealant along all edges to block humidity and bugs.
Evaluating DIY Risks vs. Choosing Real Contractors for Casement Window Installation
Replacing a small pocket window on a ground-floor room is a manageable project for an experienced DIYer. But full-frame replacements, second-story installs, or complex exterior tie-ins carry real risks to your home’s envelope, particularly around vinyl siding channels.
When hiring professional help, it is vital to understand the stark contrast between “paper contractors” and “real contractors.”
- Paper Contractors (Sales Brokers): A paper contractor is essentially a middleman or sales agency. They operate out of an office, bid out your job to the lowest-cost sub-contractor, and rarely set foot on site with tools in hand. They don’t know the nuances of retrofitting vinyl siding J-channels or setting sill pans. If a hired subcontractor fails to show up, does shoddy flashing work, or quits halfway through, a paper contractor is helpless because they lack the practical trade skills to step in and fix the job themselves.
- Real Contractors (Master Craftsmen): A real contractor like Shawn brings decades of hands-on field expertise directly to your job site. A real contractor personally understands frame squaring, structural load transfer, and how to properly interface window flashing with exterior vinyl siding to ensure a 100% watertight seal. Most importantly, if a crew member or sub ever walks off the job, Shawn has the personal trade mastery to grab his own tools, step right into the opening, and execute the installation to perfection without missing a beat or sacrificing quality.
Whether you’re located near our team handling Window Installation in Grove City Ohio or anywhere else in Central Ohio, choosing a real contractor protects your investment and guarantees long-term weather protection.
Frequently Asked Questions About Casement Windows
Why are casement windows more energy efficient than double-hung windows?
Casement windows feature a compression seal design. When you turn the crank and engage the multi-point lock, the sash is pulled flat and pressed tight against the weatherstripping surrounding the frame. Double-hung windows slide along tracks, which inherently require small clearances that can allow air leakage. Properly installed casement windows reduce air leakage by 30 to 40% compared to traditional sliding styles.
Can a casement window open left or right based on wind direction?
Yes. Casement windows are manufactured in both left-hand and right-hand configurations (hinged on the left or hinged on the right, viewed from the exterior). A great trick is to select hinge placement based on prevailing local wind patterns. When opened, a sash swinging toward the incoming breeze acts like a sail, catching fresh air and funneling it right into your home for maximum ventilation.
How much does professional casement window replacement cost?
On average, casement replacement windows cost between $600 and $1,400 per window with professional installation included. Standalone window unit costs typically range from $400 to $900 depending on frame material, Low-E glass packages, and size. Factors like full-frame demolition, high-elevation access, or custom exterior trim work will influence the total cost. To explore budgeting strategies, consult The Ultimate Guide to Window Replacement Costs.
Conclusion
Mastering casement window installation takes accurate measurements, rigorous waterproofing, and careful attention to level and plumb alignment. When installed correctly, casement windows deliver unmatched energy efficiency, effortless crank operation, and incredible airflow for your home.
If you’re ready to upgrade your windows and want the peace of mind that comes from experienced local craftsmanship in Central Ohio, Shawn and the team at Kyline Construction LLC are here to help. We take pride in honest communication, job site safety, and quality installation on every project.
Contact us today to schedule your free, no-obligation estimate and let our experienced Central Ohio crew help you transform your home!