What You Need to Know Before Applying Stone Veneer
Applying stone veneer to your home’s exterior is one of the most effective ways to boost curb appeal without the cost or weight of full natural stone.
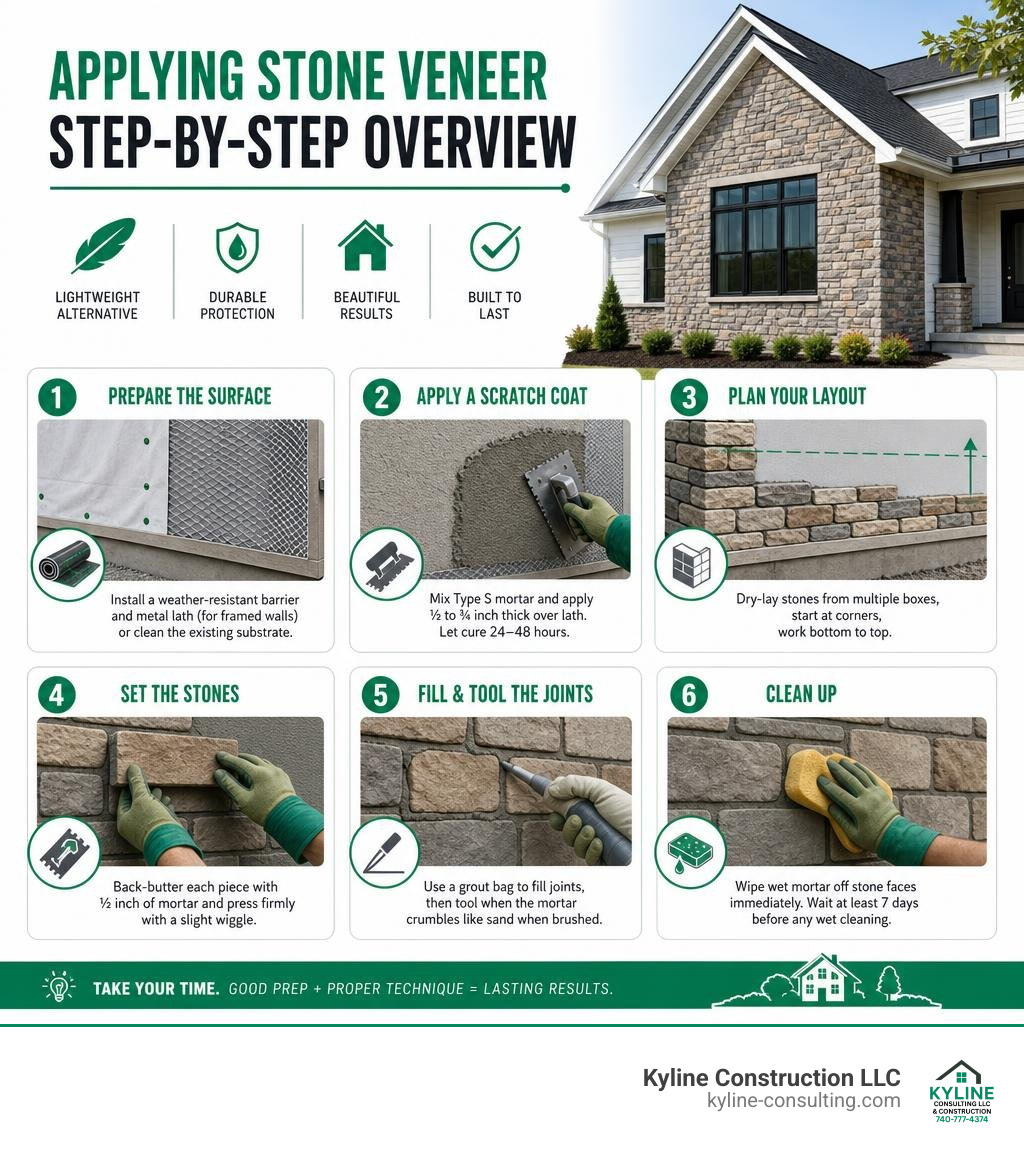
Here’s a quick overview of how it works:
- Prepare the surface – Install a weather-resistant barrier and metal lath (for framed walls) or clean the existing substrate.
- Apply a scratch coat – Mix Type S mortar and apply ½ to ¾ inch thick over lath; let cure 24-48 hours.
- Plan your layout – Dry-lay stones from multiple boxes, start at corners, work bottom to top.
- Set the stones – Back-butter each piece with ½ inch of mortar and press firmly with a slight wiggle.
- Fill and tool the joints – Use a grout bag to fill joints, then tool when the mortar crumbles like sand when brushed.
- Clean up – Wipe wet mortar off stone faces immediately; wait at least 7 days before any wet cleaning.
Stone veneer is lighter than full stone — faux and vinyl versions can be up to 75% lighter — which makes it realistic for a homeowner or skilled contractor to tackle without heavy equipment. But lighter doesn’t mean easier to do right. Surface prep, mortar selection, moisture management, and code compliance all have real consequences if skipped or rushed.
This guide covers everything: the difference between stone veneer types, surface prep for different wall types, mortar specs, layout, grouting, building code requirements, and the mistakes that cause costly failures.
Why Vinyl-Based Faux Stone Veneer is the Smart Choice
When homeowners in Columbus or Circleville ask us about updating their home’s exterior, they often start with the dream of heavy, traditional stone. However, once we look at the structural reality of their wood-framed homes, the conversation quickly shifts. This is where modern vinyl-based and polymer-based faux stone veneers step in as a brilliant, lightweight alternative.
Faux stone veneer is up to 75% lighter than natural stone. This massive reduction in weight completely changes the installation equation. Instead of worrying about whether your foundation can handle the extra load, or if your wall framing will bow under the strain, lightweight faux stone panels can be installed directly onto standard framing.
If you are already weighing your options for an exterior overhaul, it is helpful to look at how different materials stack up. We always advise homeowners to read our guide on Restore, Replace, or Reside: Making the Most of Your Exterior Siding Renovation to understand how a siding upgrade fits into their long-term home value.
In Central Ohio, our weather is notoriously unpredictable. We get scorching humid summers, freezing winters, and plenty of rain in between. Vinyl-based stone veneer systems are engineered to handle these temperature swings effortlessly. They do not absorb moisture, meaning they won’t crack when the temperature drops below freezing in January.
| Feature | Vinyl-Based Faux Stone Veneer | Standard Vinyl Siding |
|---|---|---|
| Weight | Extremely light (75% lighter than real stone) | Very light |
| Average Cost | Moderate ($6.00 to $12.00 per sq. ft. material) | Budget-friendly ($4.50 to $8.50 per sq. ft. material) |
| Installation Speed | Fast (interlocking panel systems) | Fast |
| Moisture Resistance | Excellent (built-in drainage planes) | High (requires proper WRB) |
| Impact Resistance | High (thick polymer construction) | Moderate |
| Appearance | Deep, realistic 3D stone textures | Classic horizontal or vertical laps |
Best Practices for Applying Stone Veneer Siding
Whether you are transitioning from old stucco or updating a standard wood-framed wall, proper preparation is the difference between a dry, healthy home and rot. We often work with homeowners who are dealing with failing exterior systems. If you are currently dealing with a tricky transition, you should review The Ultimate Stucco to Siding Transition Guide for Homeowners to see how we handle complex wall assemblies.
When applying stone veneer, moisture management must be your top priority. You cannot simply slap panels onto sheathing and hope for the best. You must install a high-quality Water-Resistive Barrier (WRB). For exterior applications, we recommend installing two layers of WRB in a shingle-like fashion, overlapping the horizontal joints by at least 2 to 4 inches and the vertical joints by at least 6 inches. This ensures that any water that penetrates the outer cladding is directed safely down and out of the wall system.
For a great visual guide on how these layers integrate, you can watch this How to Install Veneer Stone – YouTube video to see the step-by-step physical application in action.
Structural Requirements and Wind Resistance
When installing any siding system in Central Ohio, wind resistance is critical. Local building codes require that backup systems be designed to limit out-of-plane deflections to L/360 when subjected to 42% of the components and cladding wind pressure. This prevents the wall from flexing too much under heavy winds, which would otherwise stress the fasteners and cause the interlocking panels to unzip or rattle.
Key components of a robust moisture management system include:
- Flashing: Install corrosion-resistant flashing at all window sills, door headers, and where the siding meets rooflines.
- Weep Screeds: A weep screed must be installed at the bottom of the wall. It must terminate at least 4 inches above soil grade or 2 inches above paved surfaces like concrete driveways or patios. This gap prevents the system from wicking ground moisture up into the wall.
- Rainscreen Drainage Planes: In high-moisture areas, adding a rainscreen mesh behind the stone panels creates an open capillary break, allowing the wall to dry out rapidly if moisture gets trapped.
Planning and Estimating Before Applying Stone Veneer
Before you order materials, you need to calculate exactly how much product your project requires. Accurate estimation prevents mid-project delays and keeps your budget on track. We recommend reading the Installation Guide & Helpful Tips for deep technical insights on material handling.
To calculate the square footage of flats needed:
- Measure the width and height of each wall area to be covered.
- Multiply width by height to get the total square footage.
- Calculate the area of all doors, windows, and openings, and subtract this number from your total.
- Measure the linear footage of all outside corners. Corner pieces are sold by the linear foot, and they actually cover some flat wall area too (usually about 0.5 square feet of flat wall per linear foot of corner). Subtract this corner coverage from your flat square footage estimate to avoid over-ordering flats.
- Always add a waste allowance. Order an additional 5% to 10% of stone panels to account for cuts, breakage, and layout adjustments during installation.
Layout planning is just as important as the math. Before fastening anything to the wall, open multiple boxes of your veneer panels. Blend them on your lawn or driveway. This allows you to check for color consistency and plan your seams so that vertical joints are staggered, avoiding any obvious repeating patterns or long unbroken lines on your home’s facade.
Step-by-Step Guide to Applying Stone Veneer Panels
Once your substrate is prepped, flashed, and wrapped with your WRB, it is time to start installing the panels.
Step 1: Install the Starter Strip
The starter strip is the foundation of your entire installation. It must be perfectly level. Fasten it along the bottom of your wall, ensuring it sits at least 3 inches above grade level to prevent water infiltration and structural damage from ground moisture. Use corrosion-resistant fasteners spaced every 8 to 12 inches.
Step 2: Set the First Corner Piece
Always start your courses at the corners. Corner pieces give the wall its depth and realistic look. Align the corner piece with the starter strip, push it firmly into place, and secure it through the nailing flange.
Step 3: Interlock and Fasten the Panels
Slide the flat panels into the starter strip and lock them into the adjacent corner piece. Most modern polymer stone veneers feature an interlocking tongue-and-groove system that ensures a tight, water-resistant fit. Fasten the panels through the pre-drilled nailing slots into your wall studs.
Keep these fastening rules in mind:
- Fasteners must penetrate at least 3/4 inches into wood framing or studs.
- Do not drive the fasteners completely tight; leave a small gap (about 1/16 of an inch) between the fastener head and the vinyl flange to allow the panels to expand and contract naturally with temperature swings.
- Space fasteners every 16 inches horizontally on-center to align with your home’s studs.
Step 4: Cutting and Fitting Around Openings
When you reach windows, doors, or the top of the wall, you will need to cut the panels to fit. While standard vinyl can be cut with snips, composite and polymer-heavy panels require a cleaner cut.
We only use circular saws for composite or heavy polymer panel modifications, which ensures a clean, straight edge without cracking the material. High-quality composite siding materials have an incredible lifespan of 25-50 years, and treating them with the right cutting tools during installation ensures that their edges remain clean and weather-tight for decades.
Choosing a Real Contractor in Central Ohio
In the home improvement industry, there is a massive, critical difference between what we call “paper contractors” and “real contractors.” Understanding this distinction is the single most important factor in whether your siding project succeeds or fails.
A paper contractor is essentially a sales office. They have a sleek website, a smooth-talking salesperson, and a stack of contracts. Once you sign on the dotted line, they immediately outsource your project to the cheapest subcontracted crew they can find. The paper contractor rarely, if ever, steps foot on your job site. If that subcontractor walks off the job, gets stuck, or makes a critical error, the paper contractor has no idea how to fix it because they do not actually know how to build. They are brokers, not builders, and your home becomes a testing ground for unvetted labor.
A real contractor is hands-on, deeply involved, and physically present. At Kyline Construction LLC, we represent over 40 years of experienced professionals ensuring quality and safety. We don’t just manage paperwork; we know the trades inside and out.
If a subcontractor walks off a job site or runs into a complex structural issue, a real contractor has the practical skills, the tools, and the experience to step right in, pick up a saw, and finish the job personally to the highest standards. A real contractor understands the physical mechanics of vinyl siding installation, moisture barriers, and structural integrity. That is the level of security you deserve when investing in your home’s exterior.
We serve Circleville, Columbus, and the surrounding Central Ohio areas, providing free, no-obligation estimates. When we quote a project, we look at the structural integrity of your entire wall system to ensure your investment lasts.
Frequently Asked Questions about Vinyl Stone Siding
Can vinyl stone veneer be installed over existing siding?
No, we do not recommend installing vinyl stone veneer directly over old wood, aluminum, or vinyl siding. To ensure a flat, structurally sound, and weather-tight installation, the old siding must be stripped down to the original wood sheathing.
Once you are down to the sheathing, you can inspect for hidden wood rot, repair any structural issues, and apply a fresh water-resistant barrier. For projects involving concrete foundations, you can read our detailed guide on From Block to Beautiful: Siding Installation on Concrete to understand how we secure substrates before applying new siding.
How do you clean and maintain faux stone siding?
One of the greatest benefits of polymer and vinyl-based stone veneer is how incredibly low-maintenance it is. Unlike natural stone, you do not have to worry about tuckpointing cracked joints or applying breathable siloxane sealers.
To clean it, simply wash the surface down once or twice a year with a soft-bristle brush, mild household soap, and a garden hose. Avoid using pressure washers at high settings, and never use harsh chemical cleaners, wire brushes, or acids, as these can strip the realistic UV-resistant finishes off the panels.
What is the lifespan of polymer stone veneer?
High-quality polymer and composite stone veneers are engineered to last between 25 and 50 years. Because they are manufactured with integral color technology and robust UV inhibitors, they resist fading from sun exposure and withstand severe weather, including hail, heavy rain, and the extreme freeze-thaw cycles common in Central Ohio.
Conclusion
Applying stone veneer to your home is an incredible way to elevate your property’s style, but the longevity of that beauty depends entirely on proper moisture management, robust structural prep, and quality craftsmanship. By choosing lightweight, high-performance vinyl or polymer-based faux stone, you bypass heavy structural demands while gaining superior weather resistance.
If you are planning an upgrade, remember Shawn’s golden rule: avoid the paper contractors who only know how to sign contracts and outsource the actual labor. Work with a real, local team that has the hands-on skills, tools, and field experience to build your project right the first time.
Whether you need a full siding overhaul or want to accent your home’s entryway with beautiful faux stone, we are here to help. If you are ready to transform your home’s exterior, Upgrade your home with professional siding services and contact us at Kyline Construction LLC today for your free, no-obligation estimate.