When a Brown Stain Appears on Your Ceiling, the Clock Is Already Ticking
Roof water leak repairing is one of the most urgent home maintenance tasks you can face — and one of the most misunderstood.
Here’s a quick overview of what to do:
- Contain the water — place buckets under drips and move valuables away from the wet area
- Find the source — check your attic first; the ceiling stain is rarely directly below the actual leak
- Apply a temporary fix — a tarp, roofing cement, or waterproof tape buys you time
- Make the permanent repair — replace damaged shingles, reseal flashing, or replace a failed pipe boot
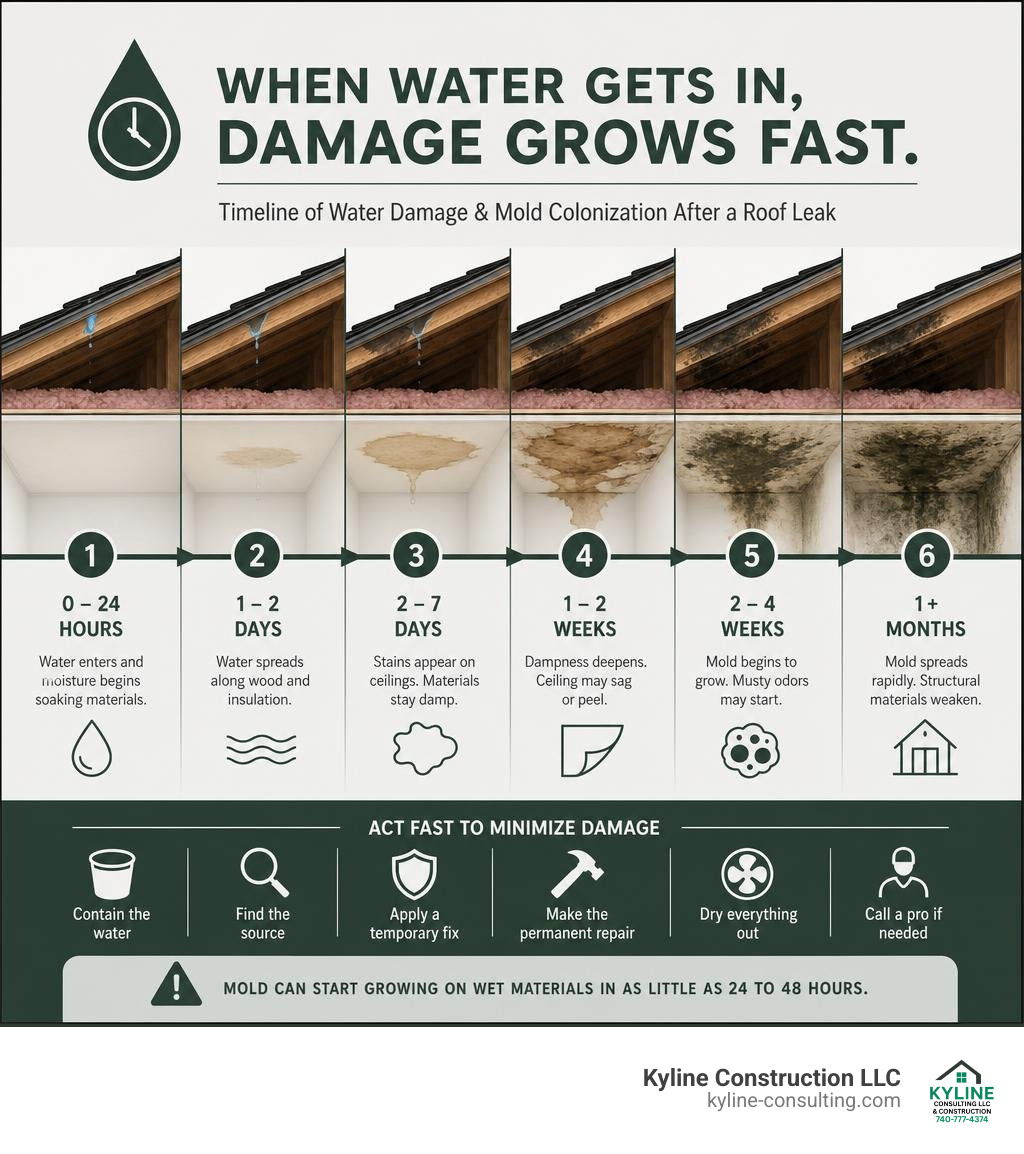
- Dry everything out — mold can start growing on wet materials in as little as 24 to 48 hours
- Call a pro if needed — structural damage, steep pitches, or widespread mold are not DIY territory
One thing most homeowners don’t realize: water rarely drips straight down. It enters the roof at one point, then travels silently along rafters, sheathing, and even electrical wiring — sometimes 10 to 20 feet — before showing up as a stain on your ceiling. That means the visible damage is almost never where the real problem is.
The stakes are real. A minor shingle repair might cost $150 to $400 if you catch it early. Let it spread to the roof deck or cause a ceiling collapse, and you’re looking at $3,000 to $10,000 or more.
I’m Shawn Zeisler, owner of Kyline Consulting LLC, a general contracting and exterior remodeling firm based in Circleville, Ohio, and I’ve spent my entire working career in construction — including diagnosing and repairing roof water leaks across Central Ohio homes. In this guide, I’ll walk you through exactly how to find, fix, and prevent roof leaks, so you can act fast and make the right call.
Simple roof water leak repairing glossary:
Finding the Source and Understanding the Stakes of Roof Water Leak Repairing
When you discover water dripping into your living room, your first instinct is probably to look straight up at the ceiling and assume the hole in your roof is directly above that spot. But water is lazy and patient; it takes the path of least resistance.
In my decades of working on homes in Columbus and Circleville, I’ve seen water enter near a ridge cap, run ten feet down a rafter, drip onto a drywall seam, and finally pool above a bedroom ceiling.
Over 60% of hidden water damage starts quietly above ceilings, slowly saturating wood, drywall, and insulation long before you see a single drip. By the time that brown ring forms, or your paint starts bubbling and peeling, the wood underneath has likely been damp for days. If you ignore the warning signs, you risk structural rot, ruined insulation, and mold colonization. According to the EPA, mold can begin growing on damp building materials in as little as 24 to 48 hours.
To prevent a small drip from turning into a major structural failure, you need a systematic approach to tracing the leak back to its true origin point. For a deep dive into the mechanics of how water behaves when it breaches your home, check out this comprehensive guide on Roof Leak Repair | How to Find and Fix a Leaking Roof | Roofs Wiki .
Tracing Water Damage from the Attic and Ceilings
If you want to find the source of a leak, you have to get dirty. Grab a bright flashlight, a moisture meter if you have one, and head up into the attic. It’s best to do this while it’s actively raining or immediately after a heavy storm.
Once you’re up there, follow these steps:
- Locate the visible stain from below: Estimate where the ceiling stain is relative to your attic framing.
- Look uphill: Water travels downward with gravity. Start at the dampest area you can find and trace the wet path upward along the rafters and the underside of the plywood sheathing.
- Inspect the sheathing: Plywood roof decking easily absorbs moisture. Look for dark water stains, white powdery mold, or structural sagging.
- Look for light leaks: If you’re inspecting during the day, turn off your flashlight. Slivers of daylight filtering through the roof boards are a dead giveaway of an exterior breach.
- Measure and mark: Use a piece of chalk to circle the wet area, or gently push a thin wire through the hole so you can spot it easily when you get on the roof later.
If you find that your insulation is completely saturated, it’s critical to address it immediately. Wet fiberglass insulation loses its thermal value entirely, clumping up and trapping moisture against your wooden framing. To understand the full cleanup and structural drying process required after a leak, refer to the detailed steps in Water Damage From Leaking Roof: Cleanup and Repair | Superior Restoration of Kentuckiana Corp .
Inspecting the Roof Exterior Safely
Climbing onto a roof is inherently dangerous, especially if it’s wet or has a steep pitch. Before you grab your ladder, use a pair of binoculars to do a visual inspection from the safety of the ground. Look for missing, curling, or cracked shingles, exposed nails, and damaged flashing.
If you must go up on the roof, safety is your absolute priority. Never step onto a wet roof. Set your extension ladder on firm, level ground, securing it so it extends at least three feet above the roofline. If your roof has a slope steeper than a 4:12 pitch, always wear a properly anchored safety harness. For a complete breakdown of safety protocols, read our guide on Residential Roof Repairs: How to Keep a Safe Roof Over Your Head.
If the leak source isn’t obvious, you can perform a garden hose test:
- Have a helper stay inside the attic with a flashlight and a phone.
- Start at the lowest point of the suspected leak area on the roof exterior.
- Run the hose slowly over one isolated section (like a pipe boot or valley) for at least five minutes.
- Work your way upward systematically. If you start at the top, water will run down and flood the entire slope, making it impossible to pinpoint the exact entry point.
Keep an eye out for old, unsealed holes from removed satellite dishes, which are notorious for causing slow, hard-to-find leaks.
Immediate Emergency Actions to Minimize Water Damage
When water is actively pouring into your home, you have to act fast to protect your property and prevent a ceiling collapse.
- Contain the water: Place heavy-duty plastic bins or buckets under the drip.
- Release the pressure: If your drywall ceiling is sagging or showing a water-filled bulge, use a screwdriver to carefully puncture a small hole right in the center of the bulge. This drains the trapped water in a controlled manner into your bucket, preventing the entire ceiling section from getting too heavy and collapsing.
- Protect your assets: Move furniture, electronics, and rugs out of the room. Cover larger items with plastic sheeting.
- Cut the power: If water is dripping near light fixtures or electrical outlets, shut off the electricity to that zone at your breaker panel.
- Document everything: Take clear photos and videos of the active leak, the damaged ceiling, and any ruined personal property. This documentation is gold when filing an insurance claim.
If the active leak is too severe for you to handle safely, you should contact our team at Kyline Construction for immediate Emergency Repair Services.
Temporary Fixes vs. Permanent Repairs
A temporary fix is designed to do one thing: stop the water now so you can plan a proper repair. It is not a long-term solution.
The most effective temporary fix for storm damage is a heavy-duty waterproof tarp. Applying a tarp within 24 hours of storm damage prevents secondary water damage that typically costs 5 to 10 times more than the original leak repair. When securing a tarp, never nail it directly through your shingles, as this creates dozens of new leak paths. Instead, wrap the edges of the tarp around 2×4 wooden boards and weigh them down with sandbags or secure them to the roof using screws driven only through non-vulnerable areas.
Roofing cement or temporary waterproof tape can also seal small shingle cracks or minor flashing gaps. However, roofing cement exposed to Central Ohio’s intense summer heat and freezing winters will degrade within one to three years. A permanent repair requires replacing the damaged materials entirely. To learn more about the differences between temporary patches and permanent structural fixes, read How to Fix a Roof Leak: Temporary & Permanent Repairs 2026 .
Step-by-Step DIY Fixes for Common Roof Vulnerabilities
If you are comfortable working at heights and have basic hand tools, many minor roof repairs are well within your reach. Taking care of these small issues yourself can save you $150 to $500 on professional service calls.
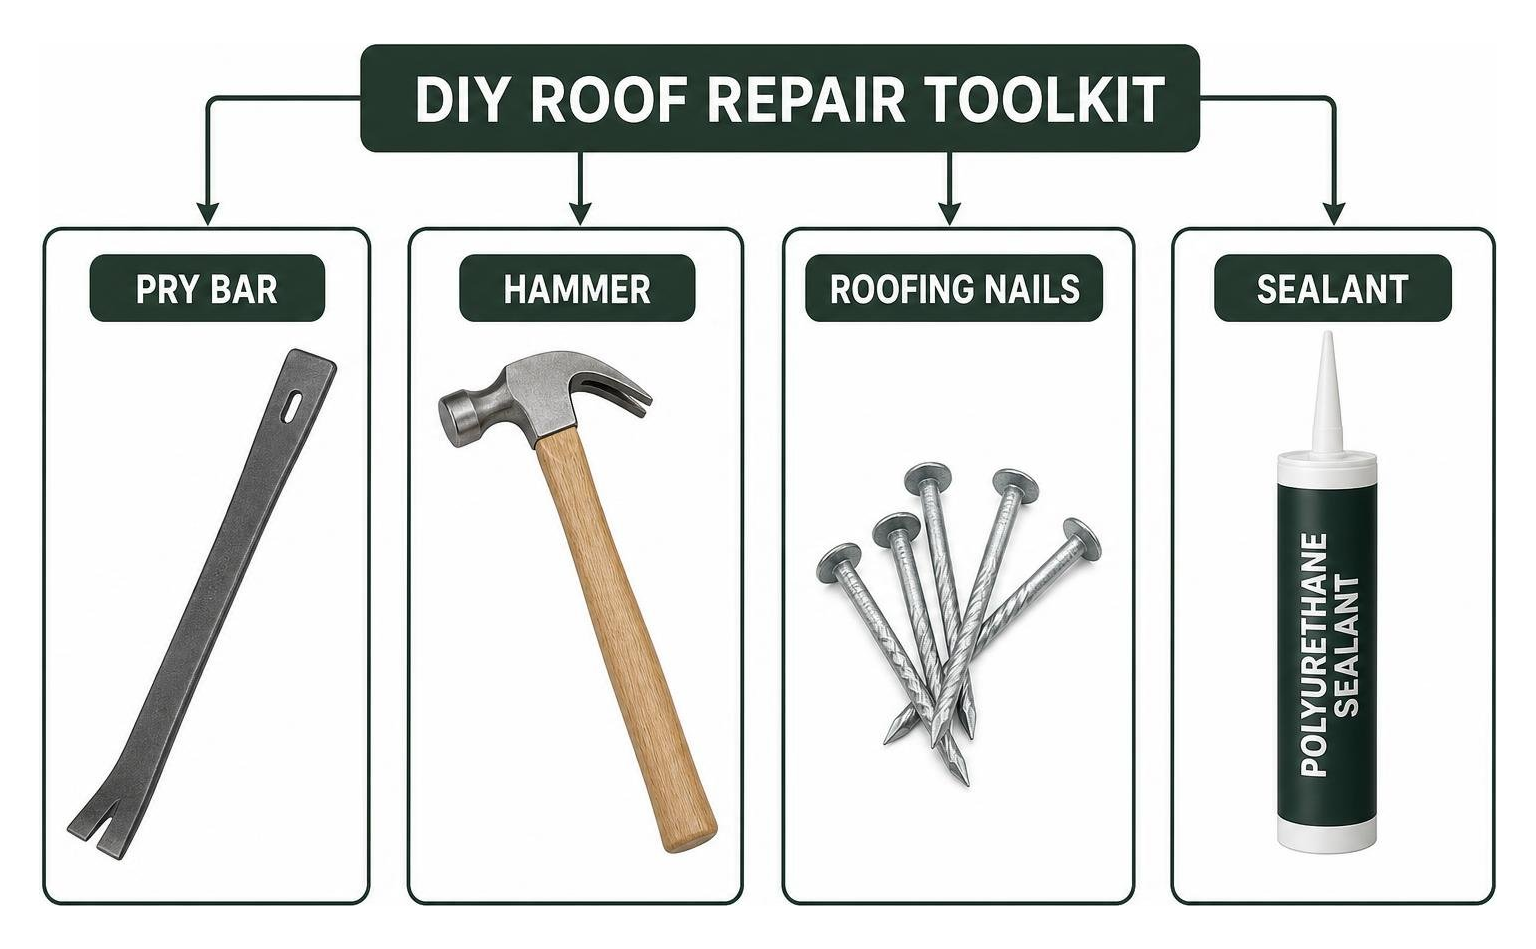
Before starting, assemble your DIY toolkit:
- Flat pry bar (shingle ripper)
- Utility knife
- Hammer and 1-1/4 inch galvanized roofing nails
- High-quality polyurethane sealant (avoid cheap silicone, which degrades rapidly under UV rays and won’t stick to shingles or vinyl siding)
- Replacement shingles matching your existing roof
For a comprehensive checklist of tools and safety gear before you begin, consult How to Fix a Roof Leak Yourself A Complete 2026 Guide for Homeowners .
Step-by-Step Guide to Roof Water Leak Repairing for Shingles
Replacing a single damaged shingle is a straightforward process:
- Locate the damaged shingle: Identify the shingle that is cracked, torn, or missing granules.
- Break the sealant bond: Carefully slide your flat pry bar under the shingle directly above the damaged one to break the tar sealant strip.
- Remove the nails: Slide the pry bar under the damaged shingle, locate the nails holding it in place, and gently pry them up. You will also need to loosen the nails on the shingle directly above it, as they often penetrate the top edge of the damaged shingle.
- Slide out the old shingle: Once all nails are removed, slide the damaged shingle out.
- Inspect the underlayment: Check the synthetic underlayment or felt paper beneath. If it’s torn, apply a small patch of underlayment or cover the tear with a thin layer of roofing cement.
- Install the new shingle: Slide the new shingle into place. Secure it with four galvanized roofing nails driven just below the sealant line.
- Seal it down: Apply a nickel-sized dab of polyurethane roofing sealant under each shingle tab to ensure it bonds securely and resists wind uplift.
For more detailed maintenance instructions, explore The Ultimate Guide to Roofing Maintenance and Replacement.
Fixing Failed Pipe Boots and Vent Boots
A failed pipe boot is the single most common source of residential roof leaks. These boots seal the plumbing pipes that exhaust sewer gases through your roof. Over 8 to 15 years, the rubber gasket surrounding the pipe dries out, cracks, and rots due to UV exposure.
Replacing a pipe boot is incredibly high-value; it costs about $15 in parts and completely eliminates a major leak risk.
To replace it:
- Carefully pry up the shingles overlapping the top and sides of the existing metal or plastic boot flange.
- Remove the nails securing the old boot and slide it off the pipe.
- Clean the area, ensuring the roof decking underneath is dry and solid.
- Slide the new pipe boot over the vent pipe. Apply a generous bead of polyurethane sealant to the underside of the flange.
- Nail the flange down at the corners, then cover the nail heads with sealant.
- Reinstall the shingles over the top and sides of the flange, ensuring the bottom edge of the boot remains exposed on top of the lower shingles to shed water properly.
For a step-by-step visual guide on vent boot replacement, see the Complete Guide to Roof Leak Repair | Pro Specialty Services .
Repairing Damaged Flashing, Valleys, and Skylights
Flashing repairs fix roughly 65% of all residential roof leaks. Flashing is the thin metal installed where the roof meets a vertical surface, such as a wall, skylight, or vinyl siding junction.
Step flashing is particularly vulnerable. About 30% of step flashing failures are caused by improper original installation rather than age. If your home has vinyl siding, the step flashing must weave behind the siding and over each shingle course. If a piece of flashing has lifted, slide it back into place, secure it with a roofing nail, and seal the nail head.
Roof valleys—where two roof slopes meet—are also prone to leaks due to the high volume of water they carry. Keep valleys completely clear of leaves and twigs, which can dam water and force it under your shingles. If an open metal valley has a small hole, patch it with a piece of sheet metal sealed with polyurethane.
If you suspect a leak around a skylight, check the rubber seals around the glass first. If the seals are intact, the leak is likely in the metal flashing surrounding the skylight frame, which requires removing the surrounding shingles to repair. For professional help with complex flashing integrations, read Roofing 101: Find Top Roofing Services.
Professional Intervention: Costs, Insurance, and Contractor Quality
While minor shingle swaps are great DIY projects, complex leaks require professional expertise. This is where understanding contractor quality becomes critical.
In the home improvement industry, there is a massive, non-negotiable difference between “paper contractors” and “real contractors.” A paper contractor is simply a salesperson with a laptop, a slick presentation, and a phone. They coordinate subcontractors but often don’t know how to swing a hammer, diagnose a complex leak, or properly integrate vinyl siding with roof flashing. If their subcontractors quit, walk off the job, or cut corners, your home is left completely exposed to the elements with no one on-site qualified to fix it. They are brokers, not builders.
At Kyline Construction, we are real contractors. With over 40 years of hands-on experience, we have the physical capability, tools, and deep expertise to step in and execute any phase of the job personally. When you hire us, you are getting true craftsmen who understand Central Ohio building codes, structural engineering, and the precise physics of water shedding. We don’t hide behind subcontracts; we stand behind our own physical labor. For tips on how to vet your roofing contractor, check out How to Find Reliable Roof Repair Fast.
When to Call a Professional for Roof Water Leak Repairing
You should put down the tools and call a licensed professional if you encounter any of the following:
- Extreme roof pitch: Any roof steeper than an 8:12 pitch requires specialized safety gear and training.
- Structural deck rot: If the plywood sheathing feels spongy or soft underfoot, it must be cut out and replaced.
- Widespread mold: Mold growth covering more than 10 square feet requires professional remediation under EPA guidelines.
- Siding and window integration issues: If water is leaking behind your vinyl siding or around window frames, the issue is likely a failure of the flashing system where your roof meets your walls.
As a general contracting specialist, we focus exclusively on vinyl siding systems and roof integrations, ensuring your entire exterior envelope is completely water-tight. If your home has suffered storm damage, read Everything You Need to Know About Storm Damage Repair.
Understanding Repair Costs and Homeowners Insurance
To help you budget, here is a realistic comparison of DIY vs. Professional costs for common repairs:
| Repair Type | DIY Materials Cost | Professional Repair Cost |
|---|---|---|
| Single Shingle Replacement | $10 – $30 | $150 – $400 |
| Pipe Boot Replacement | $15 – $25 | $150 – $350 |
| Step Flashing Repair | $20 – $50 | $300 – $800 |
| Valley Repair | $50 – $150 | $500 – $1,500 |
| Full Window Replacement | N/A | $400 – $900 per window |
| Full Vinyl Siding Repair | N/A | $11,000 – $17,000 (approx. $4 – $8 per sq. ft.) |
When dealing with your home’s exterior, focusing exclusively on high-quality vinyl siding is key. Properly installed vinyl siding provides a durable, low-maintenance barrier against the elements, but it requires precise flashing integration at the roofline to prevent water from getting trapped behind the panels.
When it comes to homeowners insurance, coverage depends on the cause of the leak. If a sudden, accidental peril (like a hailstorm or a fallen tree limb) damages your roof, your insurance company will typically cover the cost of both the roof repair and the interior water damage restoration. However, if the leak is caused by gradual wear and tear, lack of maintenance, or aging materials, your claim will likely be denied. For a complete guide on how to document damage and file a successful insurance claim, read How to Fix a Leaking Roof Causing Water Damage: Complete Solution Guide | Repairing Water Damage .
Preventing Future Leaks with Regular Maintenance
The best way to handle a roof leak is to prevent it from happening in the first place. Add these simple tasks to your seasonal home maintenance checklist:
- Clean your gutters twice a year: Clogged gutters cause water to back up under your shingles and rot your fascia boards.
- Trim overhanging tree branches: Keep limbs at least 6 feet away from your roof to prevent physical damage and stop leaves from piling up in your valleys.
- Inspect after major storms: Walk around your yard with binoculars after high winds to check for missing shingles or loose flashing.
- Ensure proper attic ventilation: Balanced intake and exhaust vents prevent attic condensation, which can mimic a roof leak and cause wood rot.
For a comprehensive guide on maintaining your home’s exterior, see our resources on Roofing.
Frequently Asked Questions about Roof Leaks
Can I seal a roof leak from the inside?
You can apply roofing cement or waterproof tape to the underside of your roof sheathing inside the attic as a very temporary emergency patch. However, this will not stop the leak. Water will continue to penetrate your shingles, rotting your wooden roof deck from the outside in. The only permanent fix is to repair the leak from the exterior.
Additionally, make sure the moisture isn’t actually attic condensation. In cold weather, warm humid air from your home can condense on cold attic rafters, creating water droplets that look exactly like a roof leak.
How long does a DIY roof patch last?
A temporary patch made with roofing cement or flashing tape typically lasts one to three years before the sealant dries out, cracks, and fails due to UV exposure and thermal expansion. A permanent shingle or flashing replacement done with proper galvanized nails and high-quality polyurethane sealant can easily last 10 to 15 years or more, matching the remaining lifespan of your roof.
How do I know if my roof deck is damaged?
If you walk on your roof and feel soft, spongy, or springy spots under your feet, your plywood decking is water-damaged and rotted. From inside the attic, look for dark water staining, black mold, or sheathing that is actively sagging between the rafters. If the damage is localized, a professional can perform “scabbing”—spot-replacing small sections of plywood around vents or valleys—rather than replacing the entire roof deck.
Conclusion
At the end of the day, water always wins if you give it an opening. Finding and fixing a roof leak early is the single best way to protect your home, your family, and your wallet. Whether you decide to tackle a minor shingle replacement yourself or call in the professionals, taking immediate action is key.
If you are dealing with a stubborn leak, storm damage, or suspect it’s time for an exterior upgrade, don’t guess. Let our team of experienced professionals at Kyline Construction LLC handle it. We bring over 40 years of hands-on expertise to every job in Circleville, Columbus, and across Central Ohio, ensuring your home is safe, dry, and beautiful.
https://kyline-consulting.com/roofing/ to schedule your free, no-obligation estimate today!