Why Proper Window Installation Matters More Than Most Homeowners Think
Window installation is one of the most impactful upgrades you can make to a Central Ohio home — affecting your energy bills, comfort, and the long-term health of your walls.
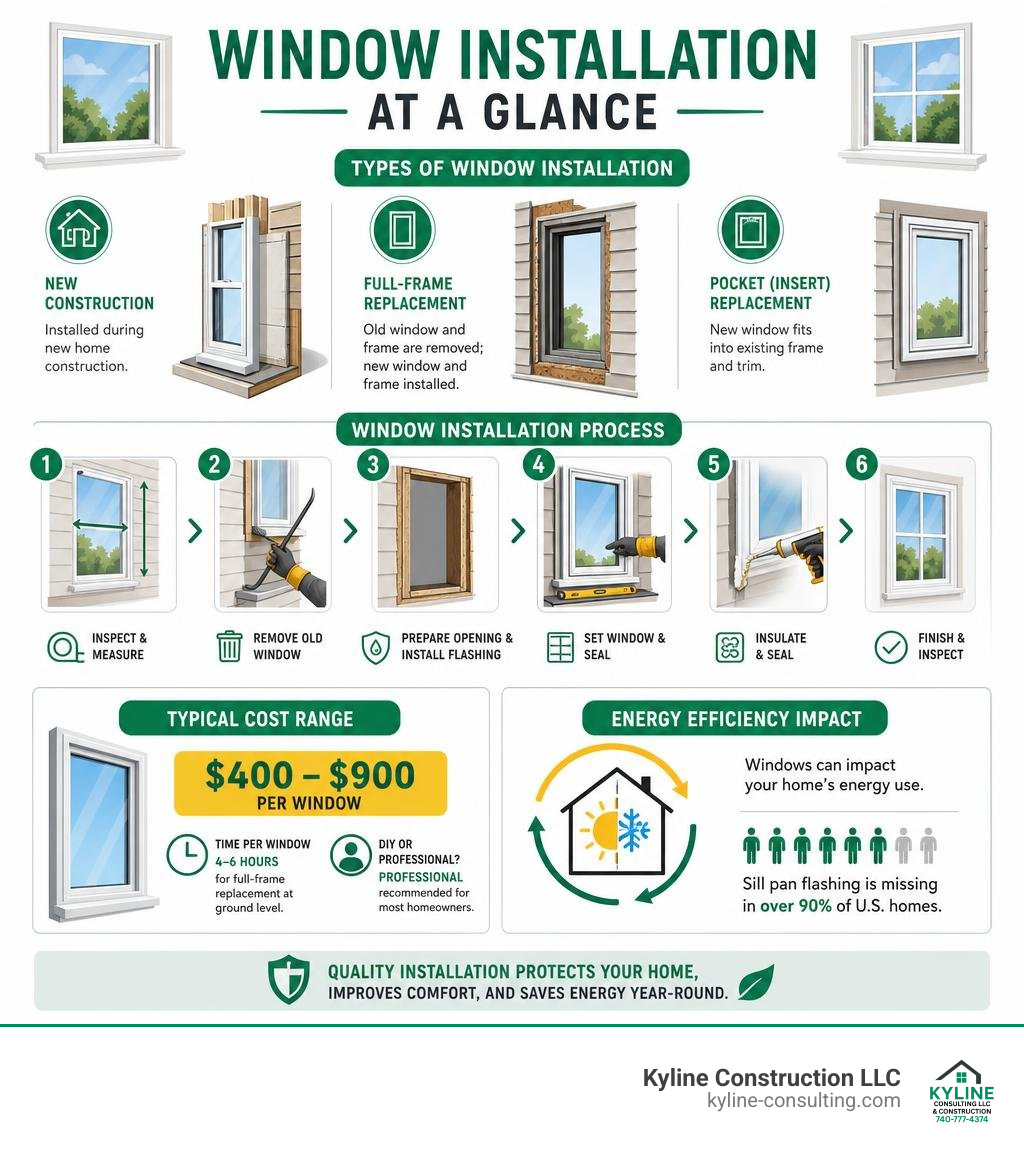
Here’s a quick overview of what you need to know:
| Topic | Quick Answer |
|---|---|
| Main installation types | New construction, full-frame replacement, pocket/insert replacement |
| Typical cost range | $400–$900 per window |
| Time per window | 4–6 hours for full-frame replacement at ground level |
| DIY or professional? | Professional recommended for most homeowners |
| Energy impact | Windows cause 25–30% of home heating and cooling loss |
| Key quality indicator | Sill pan flashing — over 90% of U.S. homes don’t have one |
Ohio winters are cold. Ohio summers are humid. And your windows are working against you more than you probably realize.
Heat gain and heat loss through windows account for 25–30% of residential heating and cooling energy use. That’s a significant chunk of your utility bill — and most of it comes down to the windows themselves and how well they were installed.
Bad installation doesn’t just mean drafts. It means water getting into your walls, rot you won’t see until it’s expensive, and energy dollars quietly disappearing every month.
The window is only as good as the installation behind it.
Understanding the Types of Window Installation
When homeowners start looking into new windows, they often don’t realize that “installing a window” can mean three entirely different processes. Choosing the wrong method for your home’s current condition can lead to premature failure, drafty rooms, or wasted money.
The three primary installation methods are new construction, full-frame replacement, and pocket (or insert) replacement.
- New Construction Installation: This method is used when the home’s framing studs are completely exposed, such as during a new home build or a major room addition. The window frame features an integral nailing fin (or flange) that sits flat against the exterior sheathing and is nailed directly to the studs.
- Full-Frame Replacement: This is the gold standard for remodeling. We remove the entire existing window, including the old frame, sashes, interior trim, and exterior casing. This exposes the raw wood opening (the rough opening) so we can inspect for hidden wood rot, replace damaged studs, and install modern water management systems. A ground-level full-frame replacement typically requires at least 4 to 6 hours per window, and more for upper floors.
- Pocket / Insert Replacement: In this approach, the existing wood window frame and exterior trim remain intact. We only remove the old operating sashes and insert a slightly smaller, fully assembled window unit directly into the old frame. It is faster and preserves historic interior woodwork, but it only works if the existing frame is completely structurally sound, square, and free of rot.
To understand how to get the most out of modern dual-pane technology during these installations, check out our guide on how to master double pane window replacement. For specific step-by-step guidance on how manufacturers structure these processes, you can review the MI Windows installation guidelines.
Full-Frame vs. Pocket Window Installation
The choice between a full-frame tear-out and a pocket insert often comes down to the health of your existing wall structure.
In older Central Ohio homes, especially those built in the late 1990s or earlier, water has often found its way past the original exterior seals. If we perform a pocket installation over a frame that has silent wood rot buried inside the wall, we are simply masking a structural hazard.
While pocket installations preserve your beautiful interior trim and save on immediate labor costs, full-frame replacements ensure long-term structural integrity. By exposing the rough opening, we can apply modern flashing tapes and build a proper drainage path. If you are trying to decide which route is right for your home, read our detailed breakdown on out with the old for home window replacement in Columbus Ohio.
When to Choose New Construction Window Installation
You don’t have to be building a brand-new house to use new construction windows. If you are planning a complete exterior renovation that includes replacing your old cladding with premium vinyl siding, it is often the perfect time to choose new construction windows with nailing fins.
Because we pull off the old siding anyway, we can access the house wrap and studs directly. This allows us to integrate the window’s nailing flange directly with the weather barrier, creating an incredibly tight, leak-proof seal.
When you bundle these projects together, the coordination of the weather barriers is flawless. If you are curious about the costs, high-quality vinyl siding generally runs between $4 and $9 per square foot, and bundling a full siding replacement (typically ranging from $11,000 to $17,000) with your windows can save you thousands in redundant labor.
Preparing the Rough Opening and Water Management
If you take away only one lesson from this guide, let it be this: water is the ultimate enemy of your home.
When we prepare a rough opening, we must design it with the assumption that water will eventually get past the outer seals. If water gets in, it must have a clear, gravity-assisted path to drain back out to the exterior.
Shockingly, over 90% of all windows installed in American homes have no sill pan under them. Without a sill pan, any water that leaks through the window joints or perimeter seals pools directly on the raw wood framing of your subfloor, leading to rot, mold, and structural failure.
To prevent this, we prepare the rough opening using a strict water-management sequence. We verify that the opening is plumb, level, and square within a strict 1/8-inch tolerance. We then install a sloped sill pan at the bottom of the opening.
For industry-recognized flashing details and high-performance specifications, you can view the 20-4002-05.indd flashing guide from YKK AP.
Step-by-Step Sill Pan and Flashing Setup
To construct a bulletproof sill pan, we follow a precise sequence:
- Slope the Sill: We ensure the rough sill has a slight outward slope. If it is flat, we install a sloped cedar shim or a manufactured slope strip.
- Apply Sill Flashing: We install a self-adhering, flexible flashing membrane (such as DuPont FlexWrap) across the sill, extending it at least 6 inches up the vertical jambs. This creates a seamless, waterproof “pan” at the bottom of the opening.
- Set the Shims: We place high-impact, waterproof horseshoe shims on top of the sill pan to support the window frame. These shims must be placed near the corners and under any vertical structural members (like mullions).
- Leave the Sill Flange Open: When we apply sealant to the window’s nailing flange, we apply a continuous bead along the top and sides, but we leave the bottom flange unsealed. This creates critical drainage weep gaps. If any water gets behind the window, it drains down the sill pan and escapes out the bottom rather than getting trapped inside your drywall.
If you are planning to tackle multiple exterior upgrades at once, read our guide on the ultimate siding and windows bundle estimate to see how proper water management is coordinated across both systems.
Sealing and Insulation Best Practices
Once the window is physically fastened into the rough opening, we must seal the interior perimeter to stop air drafts while maintaining the drainage path.
We use a two-step approach for high-performance sealing:
- Backer Rod and Sealant: On the exterior, we leave a 3/8-inch expansion gap between the window frame and the siding. We insert a closed-cell backer rod into this gap and cover it with a high-grade polyurethane sealant. The backer rod prevents “three-sided adhesion,” allowing the sealant to flex naturally as the house expands and contracts with Ohio’s seasonal temperature swings.
- Low-Expansion Foam: On the interior, we seal the gap between the window frame and the rough opening studs using a specialized, low-expansion polyurethane foam. Never use standard high-expansion foam. High-expansion foam exerts massive pressure as it cures, which can easily bow vinyl window frames, causing the operating sashes to bind and stick.
How Installation Methods Vary by Window Style
Different window styles have unique structural requirements. A fixed picture window, for example, handles gravity loads differently than a heavy double-hung window or a projecting awning window.
- Hung Windows (Single and Double-Hung): These feature sliding sashes. During installation, it is critical to keep the sashes closed and locked. This keeps the vinyl frame perfectly square while we fasten it. If you fasten a hung window frame while it is slightly out of square, the sashes will never slide smoothly and the locks won’t align.
- Casement and Awning Windows: These crank outward, putting significant leverage on the side hinges. We must install heavy-duty, structural shims directly behind the hinge attachment points to prevent the frame from sagging over time under the weight of the open glass.
- Sliding Windows: These rely on a perfectly level bottom track. If the sill frame bows upward or sags in the middle because of improper shimming, the sliding sash will stick, jump the track, or fail to seal properly against the weatherstripping.
Best Practices for Picture and Hung Window Installation
Large, fixed picture windows often feature thick, heavy insulating glass units. Because they don’t open, they require specialized setting blocks at the bottom quarter-points of the frame to distribute the weight of the heavy glass pane directly to the structural studs below.
For projects involving classic operating windows, systems like the StyleView Classic Hung Vinyl Window require precise fastening schedules. According to manufacturer specifications, fasteners must be placed every 8 to 12 inches along the jambs depending on the wind-load rating of the region.
Using high-quality vinyl for these styles is one of the smartest ways to keep your home comfortable year-round. To explore why, take a look at our article on how to go green with energy efficient vinyl windows.
DIY vs. Professional Window Installation: The Contractor Quality Gap
Many homeowners wonder if they can save money by installing their own windows. While a highly skilled DIYer with professional-grade tools can successfully install a basic pocket window, full-frame replacements and complex water-management systems are a different story.
The truth is, window installation requires a specialized set of tools — including heavy-duty aluminum brake coils for custom exterior trim capping, professional caulking guns, laser levels, and scaffolding for upper-story work.
But the biggest factor isn’t the tools; it’s the expertise. And this is where I need to warn you about the massive Contractor Quality Gap that plagues the home improvement industry.
The Critical Difference: Paper Contractors vs. Real Contractors
Understanding who you are actually hiring is the single most important factor in the success of your project. In the home improvement industry, there is a vast, often hidden divide between two types of companies: paper contractors and real contractors.
- Paper Contractors (The Salesmen): These are marketing and sales organizations disguised as construction companies. They boast beautiful offices, slick sales representatives, and massive advertising budgets. However, once you sign the contract, their involvement in your home ends. They simply broker the labor out to the cheapest third-party subcontractors they can find on any given week. The person who sold you the job has likely never held a framing hammer, has no technical understanding of water management, and cannot supervise the work. If the subcontractor walks off the job halfway through or makes a critical flashing error, the paper contractor has absolutely no idea how to step in, diagnose the issue, or finish the installation. You are left dealing with a middleman who only knows how to push paper.
- Real Contractors (The Builders): A real contractor is a builder first, last, and always. At Kyline Construction LLC, we are hands-on professionals who live and breathe construction. If a subcontractor crew ever experiences an emergency or walks off a job, I have the personal skills, tools, and decades of hands-on experience to step onto the job site and finish the installation myself. We don’t hide behind sales scripts or corporate call centers. We know exactly how to flash a window, cut vinyl siding, and seal a sill pan because we’ve done it with our own hands for our entire careers. When you hire a real contractor, you are paying for actual craftsmanship and accountability, not a broker’s markup.
Before you make a decision, we invite you to schedule your complimentary window estimate with a team of real, local builders.
Evaluating Local Central Ohio Contractors
If you are looking for window installers in the Columbus, OH, or Circleville areas, it pays to do your homework. You can find local reviews and ratings by browsing the Yelp top Columbus window installers list to see how different local teams stack up.
While national brands and large regional names like APCO or Champion Replacement Windows of Circleville, OH, have a major presence, you should always ask: Who is actually doing the work on my house? Are they certified? Do they understand local building codes?
For a complete guide on how to screen these companies, read our article on the top rated window companies in Columbus Ohio.
Energy Efficiency Ratings, Warranties, and Post-Installation
When shopping for new windows, you will see several performance labels. The most important is the National Fenestration Rating Council (NFRC) label, which provides unbiased energy performance ratings.
To maximize your energy savings in Central Ohio’s climate, look for these two key metrics:
- U-Factor: This measures how well the window prevents heat from escaping your home. The lower the U-factor, the better the window insulates. In Ohio, you want a U-factor of 0.27 or lower.
- Solar Heat Gain Coefficient (SHGC): This measures how much solar radiation passes through the glass, warming your rooms. In our climate, an SHGC of 0.25 to 0.30 strikes the perfect balance — blocking intense summer heat while allowing some beneficial solar warmth inside during our freezing winters.
To learn how to read these labels like a pro, check out our smart shopper’s guide to window performance ratings.
Additionally, if your home was built before 1978, there is a high probability that the original window frames contain lead-based paint. Disturbing this paint during a full-frame tear-out can release hazardous lead dust. Federal law requires that contractors working on pre-1978 homes be EPA Lead-Safe Certified. Our team takes all necessary precautions, including plastic barriers and HEPA vacuum cleanups, to keep your family safe.
Frequently Asked Questions About Window Installation
How long does a typical window installation take?
For a standard ground-level window, a professional two-man crew performing a full-frame replacement takes about 4 to 6 hours. Pocket replacements are faster, often taking only 1 to 2 hours per window. If you are replacing all the windows in a typical two-story home, expect the project to take 2 to 3 days, depending on weather conditions.
What is the difference between a paper contractor and a real contractor?
The difference is night and day. A paper contractor is merely a sales broker who marks up the price and hires cheap, independent subcontractors to do the actual physical labor. They lack the technical expertise to supervise the quality of the installation or fix mistakes. A real contractor is an experienced, hands-on builder who actively manages the job site, understands the physics of water management, and possesses the personal skills and tools to step in and complete the installation themselves if needed.
Why is a sill pan so critical for preventing water damage?
Over 90% of residential windows lack a sill pan, which is the leading cause of hidden structural rot. A sill pan is a sloped, waterproof barrier installed at the bottom of the rough opening. If water ever gets past the exterior caulk or window seals, the sill pan catches it and channels it safely back outside through designated weep holes, protecting your wall framing from rot and mold.
Conclusion
At the end of the day, window installation is an investment in the comfort, safety, and value of your home. High-quality vinyl windows can dramatically lower your energy bills, but only if they are installed with absolute precision.
At Kyline Construction LLC, we bring more than 40 years of hands-on professional experience to every single project we touch. We don’t believe in high-pressure sales tactics or brokering your home out to the lowest bidder. Whether you are looking to replace a single drafty window or want to bundle a complete window upgrade with premium, low-maintenance vinyl siding, our local team is here to ensure the job is done right.
We proudly serve Columbus, Circleville, and the surrounding Central Ohio communities. If you are ready to experience the difference that real, honest craftsmanship makes, contact us today for a free, no-obligation estimate.
Learn more about how we can transform your home by visiting our Kyline Construction LLC Windows Services page.